
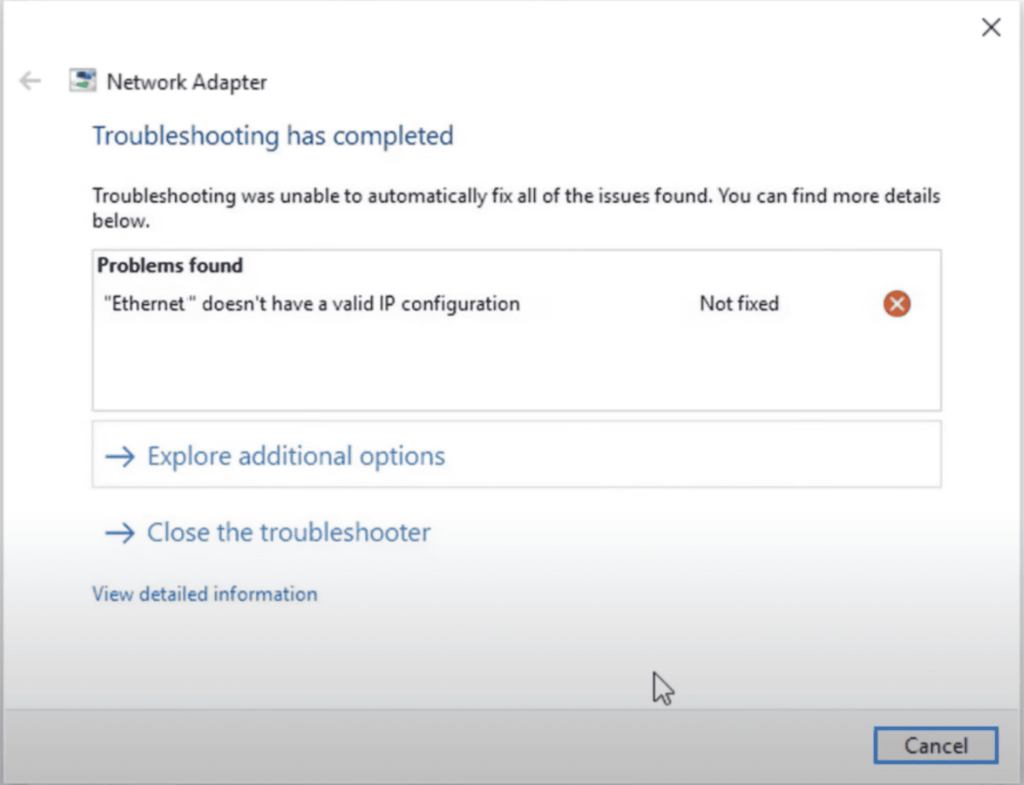
This error means your ethernet connection isn’t receiving any IP address from DHCP. An IP address is a medium your computer uses to connect to the internet. It is what makes your PC unique within a crowd of thousands of networking devices.
This can happen for several reasons, from incompatible or corrupted drivers to underlying hardware issues, but mostly it pertains to storing network cache or temporary network glitches.
Quick Fix: Restart your computer and internet equipment, i.e., modem and router. If it persists, go through the subsequent sections which detail the fixes and the underlying procedure.
Potential Causes
- Your network adapter driver is either incompatible with your OS or corrupted.
- A misconfigured network or router settings like an incorrect IP address, gateway, DNS server, or subnet mask.
- Faulty or loose Ethernet cables can result in invalid IP configuration.
- Your networking device is facing issues or problems that might result from outdated firmware, overheating, or other hardware issues.
- If your router is set to receive network automatically via a DHCP, any issues with it can result in the error.
- If two or more devices have the same IP, there can be an IP address conflict.
- Overly restrictive security software or firewalls can restrict traffic to maintain a smooth flow.
- In some cases, there might be some pertaining hardware issues.
Fixing The ‘Ethernet Doesn't Have a Valid IP Configuration' Error
In the subsequent sections, I will provide multiple solutions pertaining to respective issues, so you can get your internet connection back on track. For faster resolution, follow the solutions in the same order as given below.
1. Restart Your Modem, Router, and PC
This might sound basic, but restarting your modem, router, and PC often fixes the most profound of the hardware/software issues. But before you start, save all your work and progress, then follow the stepwise process to shut your computer down:
Step 1: Click on the Windows icon to open the Start menu.
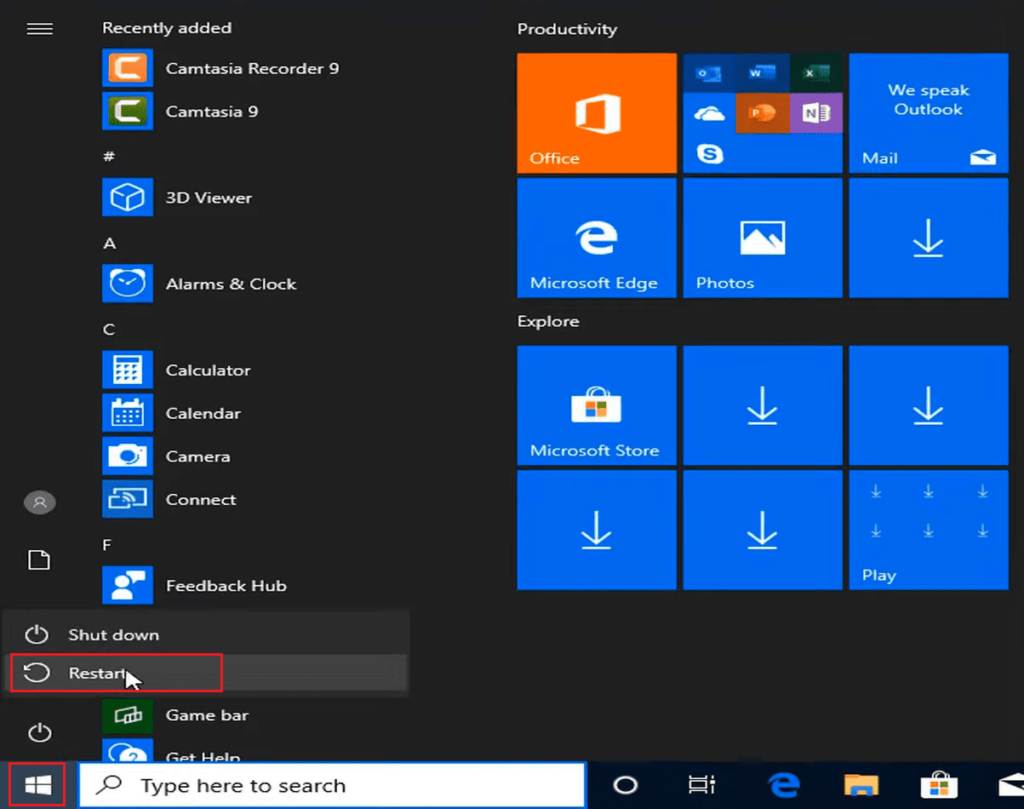
Step 2: Tap on the power icon that opens up a pop-up menu, and click Restart. It automatically shuts down the computer and boots it back up without you needing to provide any manual input.
Step 3: Log back into your windows by providing the respective user credentials.
Steps To Restart Modem or Router:
- Unplug your networking device from the power source and keep it that way for a few minutes. As far as my experience goes, two to three minutes of cooldown would be enough.
- Plug it back in and let it boot up. Wait until the indicator lights on it turns solid.
- Check if the error with your Ethernet persists or not.
- Ensure the cable you’re using is in a functional state, or try checking with another cable.
2. Reset TCP / IP Stack
If just restarting your computer & networking devices hasn’t done the trick, resetting the TCP/IP stack certainly can be a savior.
For that, access the Command prompt and put in the netsh command. It lets you display or modify the IP settings on your computer.
Follow the steps below:
Step 1: Find the Command prompt in the start menu by typing the same in the search bar, or press Win+R to open the Run tab and search cmd.
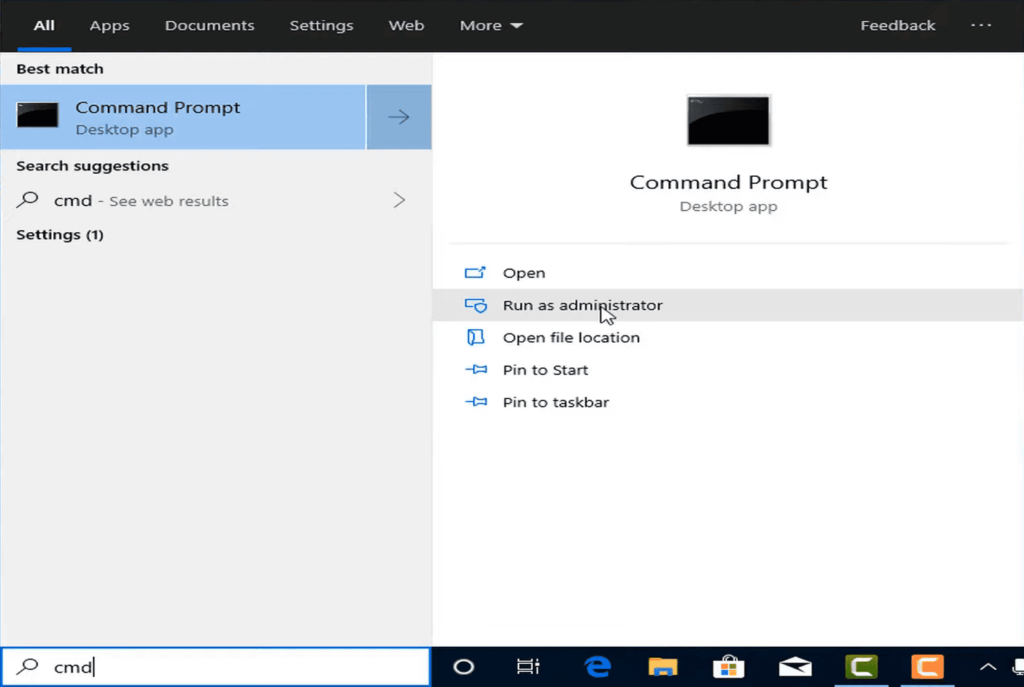
Step 2: If using the search tab, right-click on the icon, followed by tapping on “run as administrator” to open up the Elevated command prompt. Otherwise, press Ctrl + Shift + enter to do the same in the Run window.
Step 3: In a user-controlled account, it’ll ask for permission to launch the application. Click on Yes.
Step 4: On the command prompt window, type in commands like netsh winsock reset, netsh int ip reset, netsh advfirewall reset, and press Enter.
If these don’t work, follow up by typing in ipconfig /release. When you type in your first command, the computer might ask for a restart. For now, ignore it, and move on to type in your second command.
Now let me brief you about what these commands are for.
1. netsh winsock reset

Resetting Winsock undos all the changes in IP settings made by the Winsock catalog. These changes might be made by networking programs like email clients, web browsers, and VPN programs. A reset reverses the wsock32 DLL back to its factory-made state, giving it a fresh start to connect with TCP/IP traffic.
2. netsh int ip reset

netsh int ip reset is a powerful command to troubleshoot the network, which reset the content of two registry keys used by TCP/IP. It’s just like removing and re-installing the TCP/IP protocol. In short, the protocol just starts fresh.
3. netsh advfirewall reset
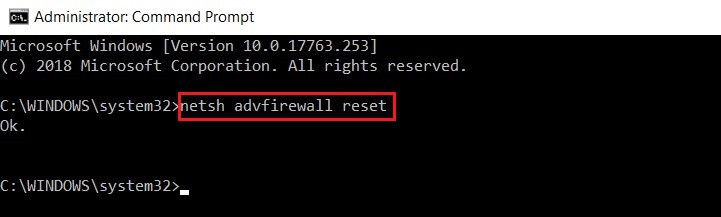
Many times, in order to keep your system safe from malware, adware, and other unwanted elements, you end up permitting a security software to launch its advanced security policy that restricts even the traffic flow. This is where the following command comes in handy.
As soon as you press enter, it takes back your security software to its default policy, and so the restrictions are gone.
4. ipconfig /flushdns
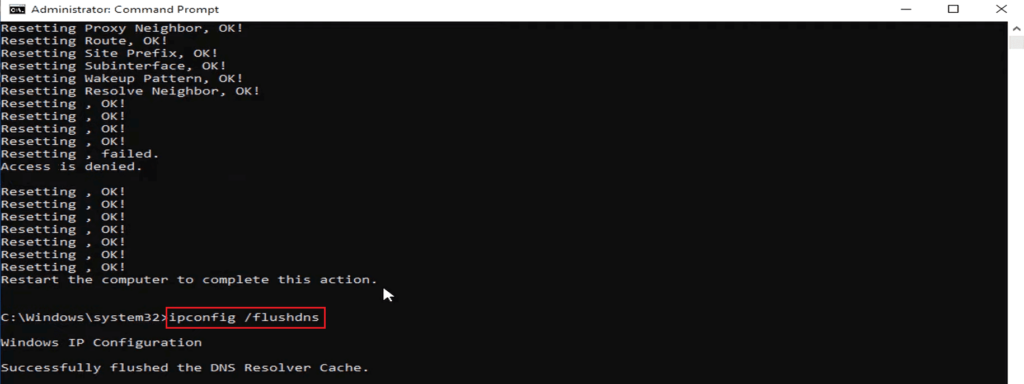
While DNS cache can speed up your network, it also interrupts and blocks the connection if the cached information becomes corrupt or outdated. The ipconfig/flushdns command is meant to flush out or clear the DNS cache and let your browser retrieve the latest information, and return to its optimal working condition.
3. Re-install Network Adapter Driver
In many cases, an incompatible or corrupted driver can be a major reason behind the ethernet not having a valid IP configuration. So you might need to re-install the network adapter driver. Here’s how you can do it:
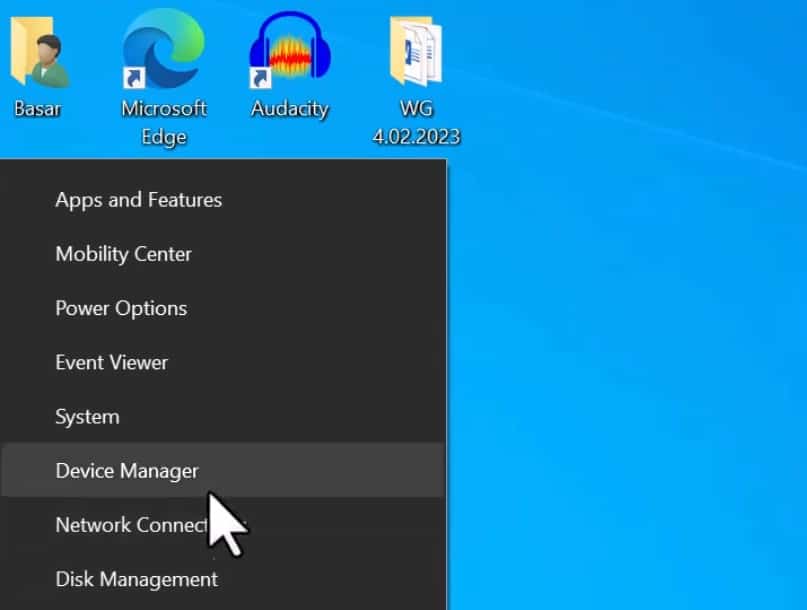
Step 1: Similar to finding the Command prompt, type in Device Manager on the search panel, and press enter or press Windows+S to open up the search panel. Or you can type in hdwwiz.cpl in the Run tab and press OK.
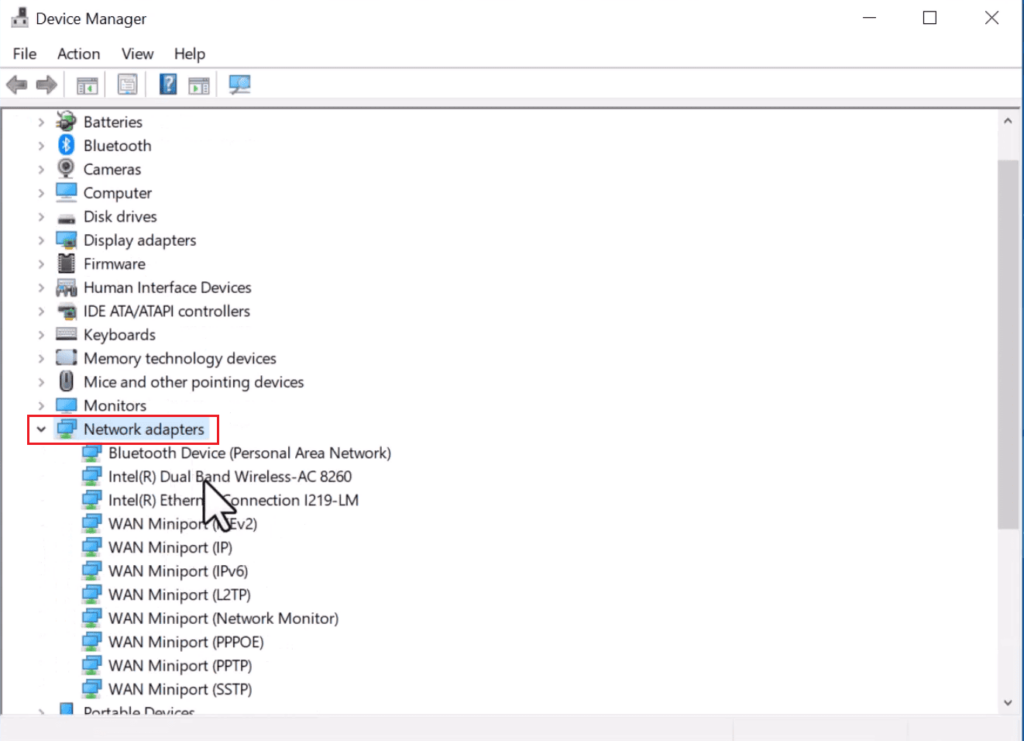
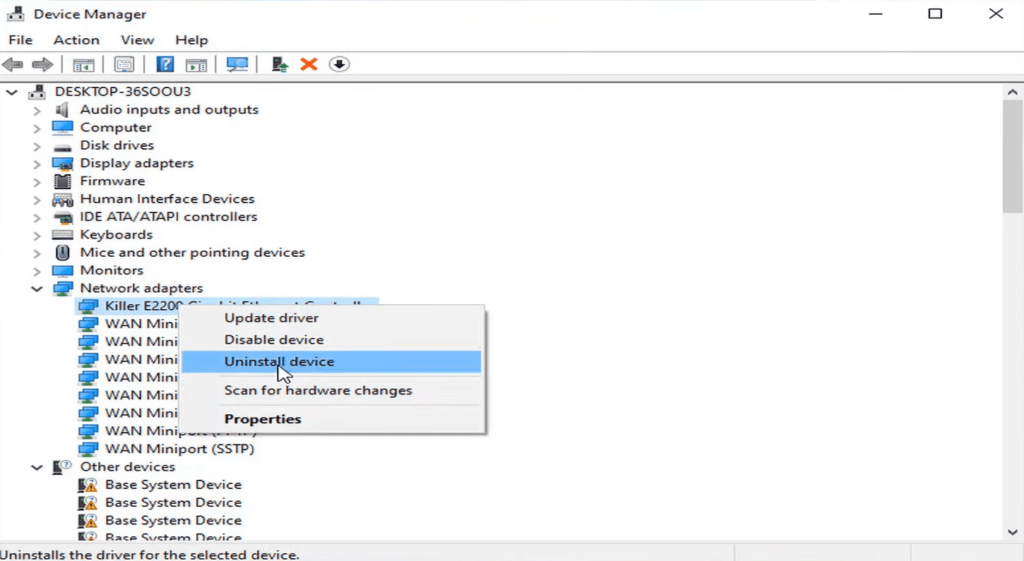
Step 2: This opens up the Device Manager window that displays the devices connected to your computer. Find the Network Adapter, expand it, and right-click on it to open a pop-up menu. Tap on the “Uninstall device” option. Then as it asks for a confirmation, press Uninstall.
Step 3: Boot up your computer, and check Device Manager if Windows has installed the uninstalled drivers. If not, right-click on the computer name, and tap on “scan for hardware changes”. Windows automatically scans for missing drivers and installs them.
Step 4: The task doesn’t end here. Right-click on the network driver followed by “update driver”. The computer then provides two options: one, if you want it to find the latest drivers and install them, or you can manually do that. The latter requires downloading the latest adapter driver from the manufacturer’s website.
4. Disable Fast Startup
This feature is there in your Windows 10 to let your computer start up faster after a shutdown. However, it can elicit multiple issues, including ethernet not having a valid IP configuration, and you can try deactivating it to get things back on track.
Here’s how you can do it:
Step 1: Search for the Control panel and click on the icon to launch it.
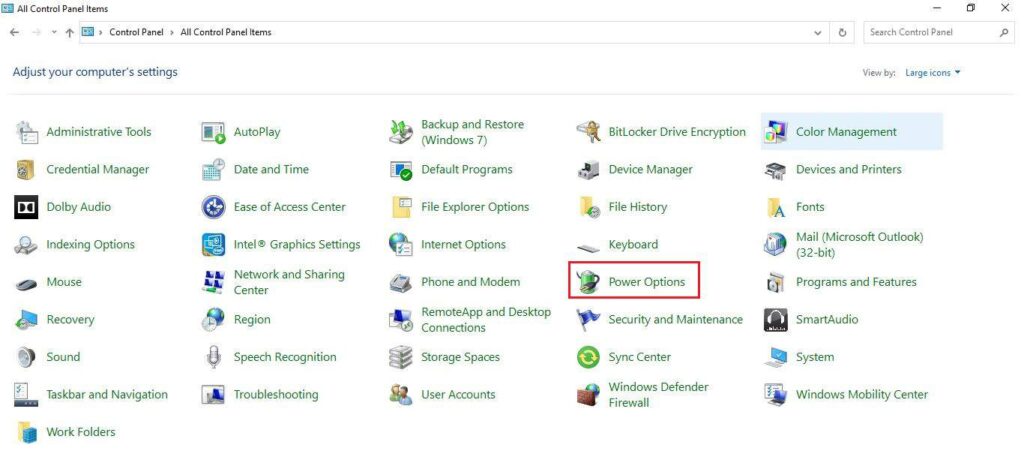
Step 2: The window shows all the control panel items, from which find the power options tab and click on it.
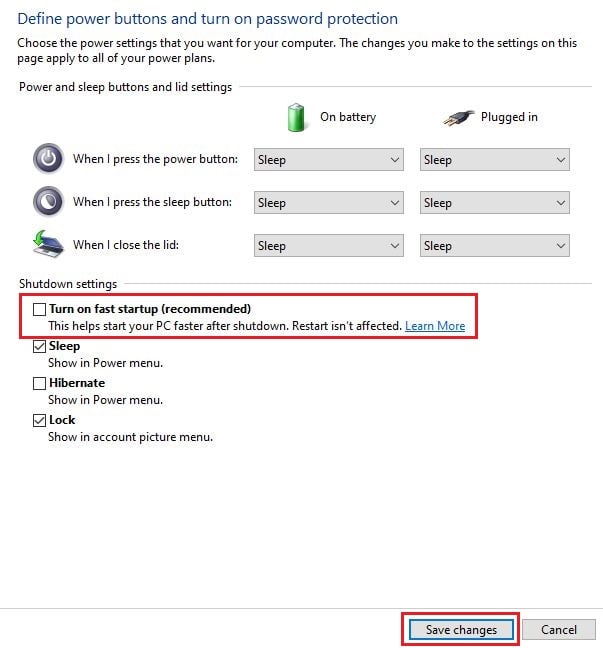
Step 3: Proceed to click on “Choose what power buttons do” on the left panel, followed by clicking the “Change settings that are currently unavailable” link. You might need the administrator password to access that.
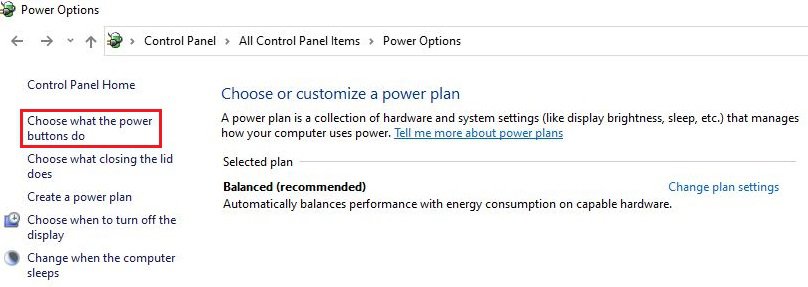
Step 4: Uncheck the Fast startup option under Shutdown settings, and click on Save Changes. Turning off the option might resolve the Ethernet issue with IP configuration. If not, proceed to the next step.

5. Disable Microsoft Kernel Debug Network Adapter
Microsoft Kernel Debug Network Adapter is a networking device that collects data from Windows Kernel for debugging purposes. Many issues like slow DNS lookup, weak WiFi signal, slow DNS lookup, and IP misconfiguration are reported when the adapter is enabled.
To disable it, follow these steps:
Step 1: Search for the Command Prompt and run it in administrator mode to open up the Elevated command prompt.
Step 2: Enter the command bcdedit /debug off.

Step 3: The computer asks for a restart after saving the settings. Once it does, your connection should get back to normal.
Or if you aren’t using Command Prompt, here’s what you do:
Step 1: Open Device Manager by searching the same on the search bar.
Step 2: Find the Network adapters icon and left-click to expand it.
Step 3: Right-click on the Kernel debug adapter and select disable device from the pop-up menu.
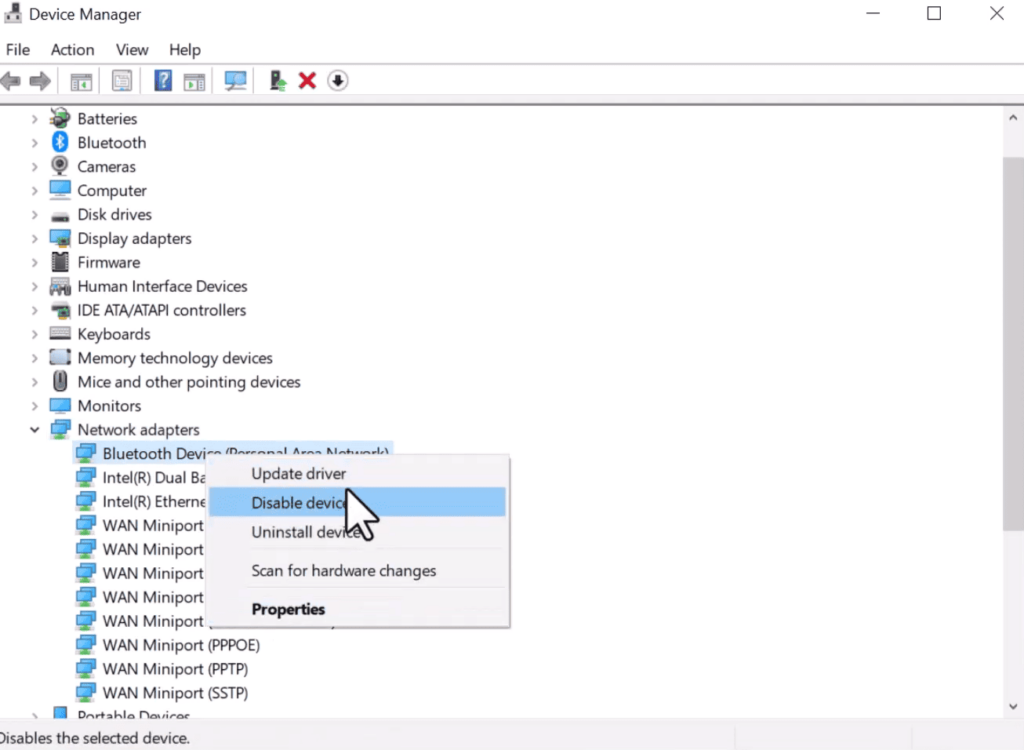
Step 4: On the confirmation pop-up, click Yes.
Step 5: Reboot your computer.
6. Try Foce IPV4 (and Disable IPV6)
IPv6 is much faster than IPv4 in network devices as it lacks network address translation (NAT) but often results in connectivity issues. If you’re going through the same, I’d suggest disabling IPv6 following the mentioned steps:
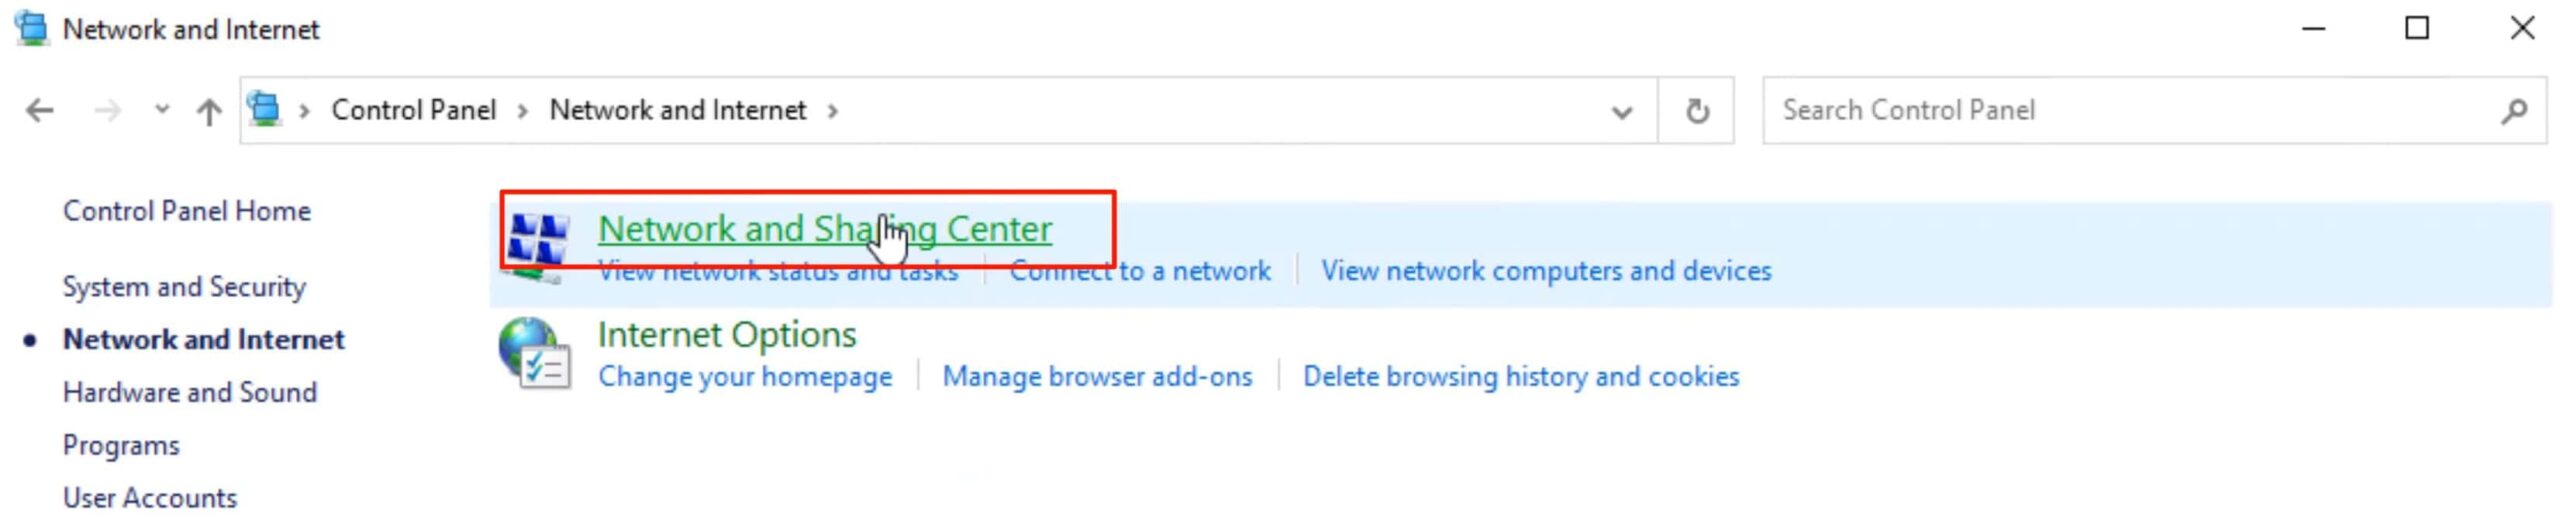
Step 1: Open the control panel followed by clicking on Network and Internet tab.
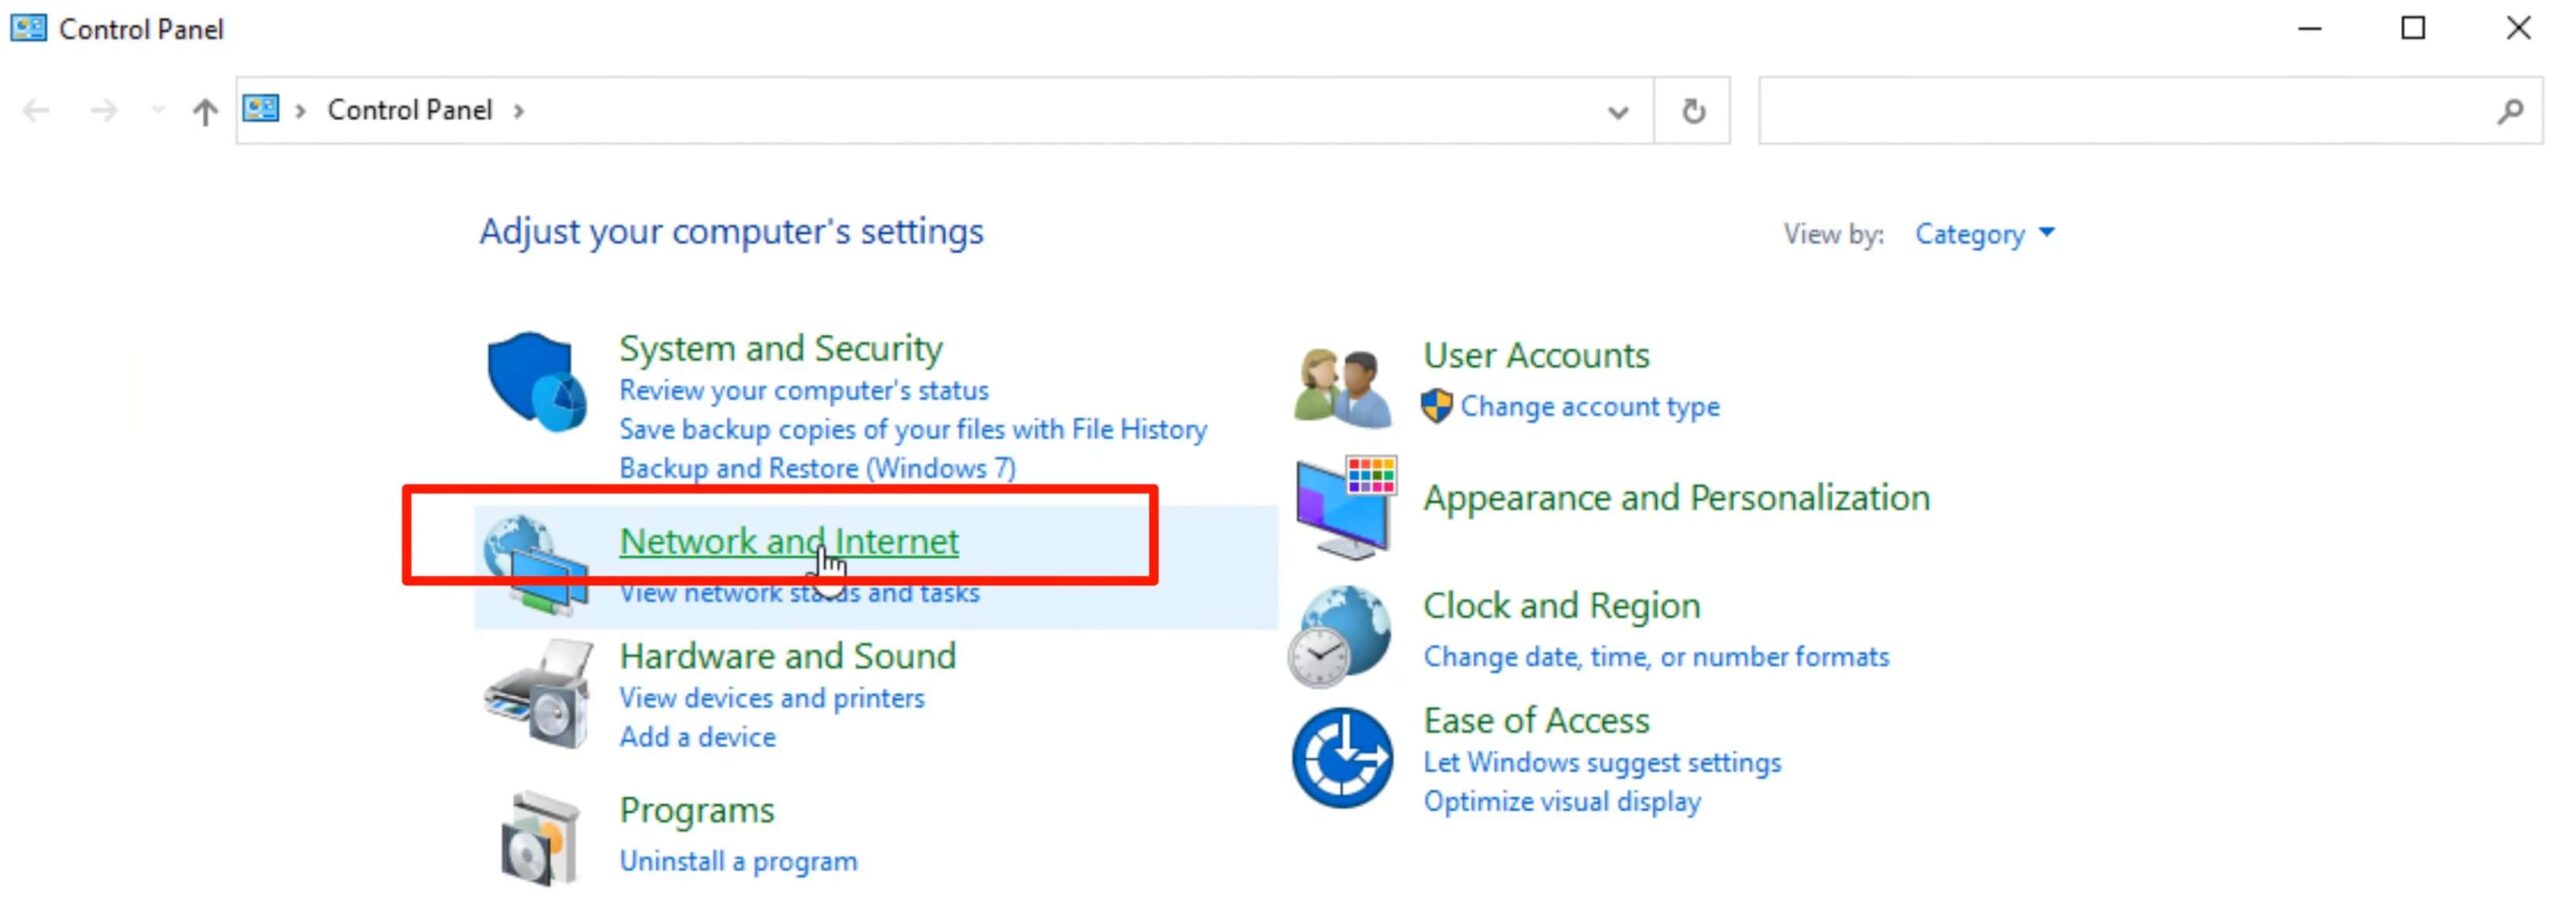
Step 2: On the new window, find and click on the “Network and Sharing Center” tab.
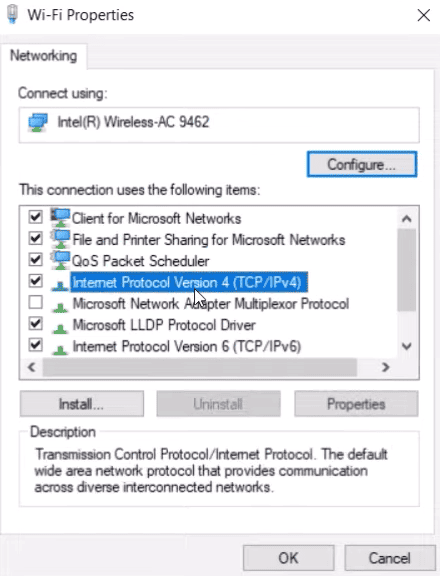
Step 3: Then, click on Change adapter settings, right-click on Ethernet, and select Properties from the pop-up menu.
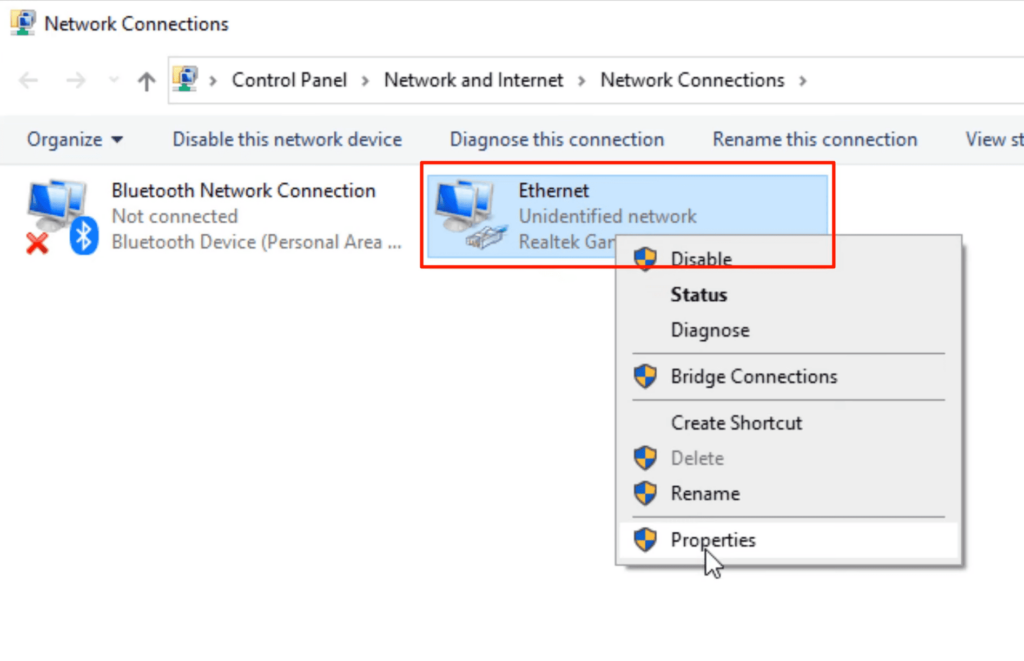
Step 4: Uncheck the IPv6 box and click OK to disable it.
Verify if the issue is resolved, and if not, proceed to the next step.
7. Enable DHCP
DHCP, or Dynamic Host Configuration Protocol primarily works to automatically assign IP addresses to devices on a network. It uses a client-server architecture to communicate on an IP network. So, if DHCP is disabled, the devices don’t have any path to connect, and thereby the issue.
Step 1: On the search bar, type settings, and then click Settings> Network & Internet.
Step 2: If you’re on a wireless network, click Wi-Fi > Manage known networks, and select the network you want to manage. And if on a wired connection, select the connected Ethernet network.
Step 3: Move on to the IP assignment and select IP.
Step 4: Under the Edit IP settings or Edit Network IP settings, select Automatic or Manual DHCP. In automatic your router automatically sets the DNS server address and IP address settings, while you need to manually set those in the manual DHCP setting.
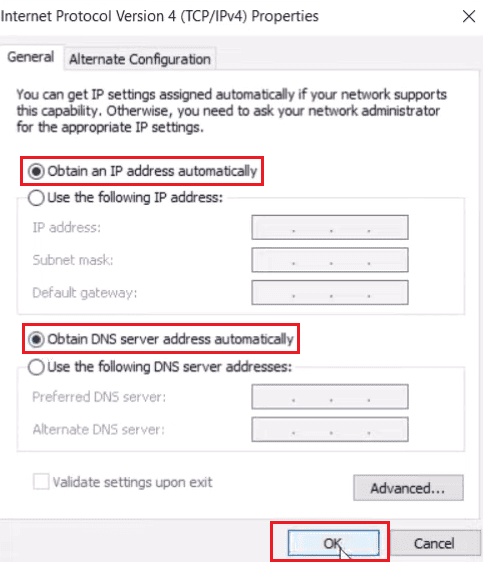
When you’re done, click Save.
8. Try a Wired Connection
If you have multiple devices like switches and repeaters in your network, connecting them directly to your computer can be a smart choice. Issues like not having a valid IP configuration can happen if network devices aren’t configured properly.
Try connecting to the interne via ethernet to ensure if there are any underlying issues or not. If all of them remain functional, there’s some hardware issue.
9. Turn Off Antivirus Software
As mentioned earlier, some antivirus even restricts the traffic between the devices in an attempt to keep your devices safe. You can try turning them off to ensure optimal functionality. To disable it, go to antivirus settings, and click disable. And if the issue still persists, proceed to the next step.
10. Turn Off Other Router Optimizations
There are many built-in features in your router meant to improve WiFi speeds and performance, but they often rummage through the network settings, causing errors like ethernet not having a valid IP configuration.
These include outdated firmware, QoS, and others. Disable the respective settings and check if it’s working as intended. And to update the firmware, follow the steps:
Step 1: On your browser, access the ISP's official website and log in by entering the user ID and password.
Step 2: Find and click maintenance > update/firmware update, and download the firmware.
Step 3: Click on it to run. It takes a few seconds to install, and once it’s done, you’re ready to access your internet connection.
Tips To Prevent Such Errors From Happening
- Try keeping the wires connecting your modem to devices in perfect working condition, or use high-quality cables.
- Power cycle your router/modem more often.
- Keep your firmware updated
- Keep the network drivers up to date
- Configure status IP address
Frequently Asked Questions
IP configuration, as in the name, configures the parameters of Internet Protocol, allowing the devices to send and receive data packets. In simple words, these are the settings that let a device establish an internet connection.
Conclusion
I hope my provided fixes helped you get through with the no valid IP configuration on Ethernet. If none of the methods does the trick, ensure to connect with your ISP to check if there’s any issue on their end.
Thank you for reading!