How To Set Up TP-Link Extender? [3 Easy Methods]


Are you struggling with weaker WiFi signals and have got a TP-Link extender to improve wireless coverage? Or, have you just reset the TP-Link extender and are now looking to set it up? You’re in the right place.
There are three ways of a TP-Link extender setup:
- Using a Tether App
- Using a Web Interface
- Using a WPS Button
Each method offers convenience and flexibility to ensure a seamless and reliable connection. I will discuss all three ways, step by step. Let’s begin!
How To Set Up a TP-Link Extender?
To proceed, you need the extender itself, a power outlet near the main router, and a WiFi-enabled device such as a computer or smartphone. Next, find a suitable location to place an extender.
Note: Before setting up your TP-Link WiFi extender, ensure that you know the SSID (network name) and password of your existing Wi-Fi network, as you will need them during the setup process.
Method 1: Using a Tether App
The Tether app provides a user-friendly interface to configure a TP-Link range extender using a smartphone. It simplifies the process and allows for easy configuration and management.
You simply need to download the Tether app on your smartphone or tablet, connect to the network, and follow the on-screen instructions.
Steps To Follow:
Step 1: Download and install the Tether app from the App Store or Google Play Store.
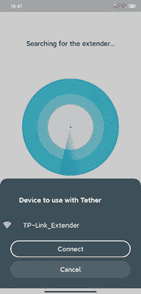
Step 2: Connect your smartphone to the Extender’s default network.

Step 3: Open the Tether app and follow the on-screen instructions to complete the setup process.
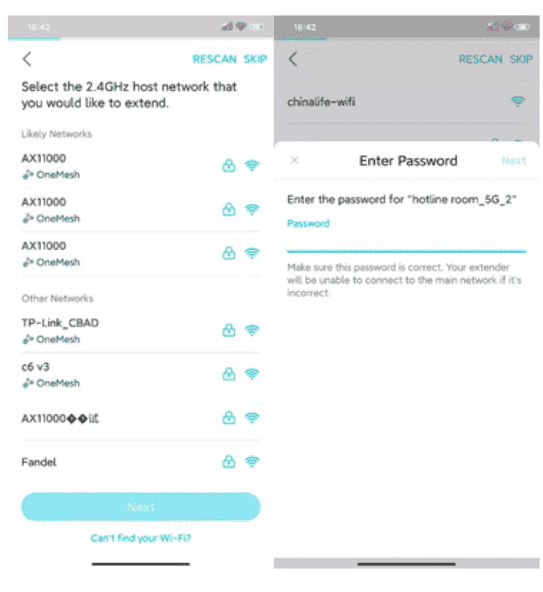
Step 4: Select your existing WiFi network from the available options and enter the password.
Step 5: Wait for the extender to restart and establish a connection with the main router.
Step 6: Connect your Wi-Fi-enabled devices to the extended network.
Method 2: Using a Web Browser (Web GUI)
This method allows you to connect the TP-Link extender and establish a connection with more settings. To use this method, you will need to connect your computer to the extender’s Wi-Fi network and open a web browser.
Steps To Follow:
Step 1: Connect your computer or smartphone to the Extender’s default network.
Step 2: Open a web browser and enter “tplinkrepeater.net” or the default IP address in the address bar.
Step 3: Enter the login credentials (default username and password).
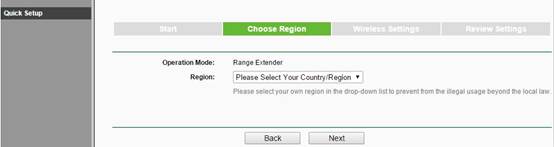
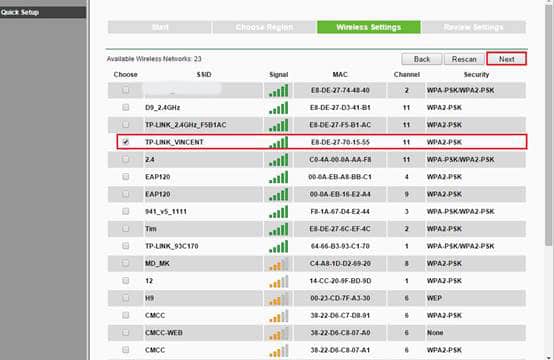
Step 4: Follow the on-screen instructions to select your region and choose the wireless network to extend.
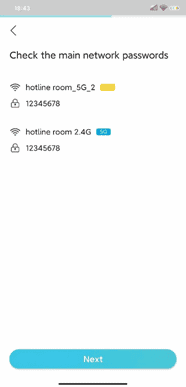
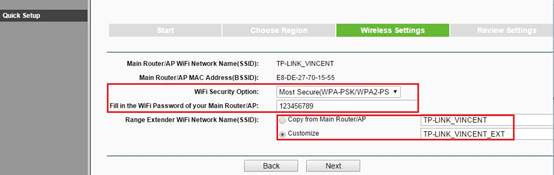
Step 5: Enter the SSID and password of your existing Wi-Fi network.
Step 6: Wait for the extender to restart and establish a connection with the main router.
Method 3: Using a WPS Button
This method is the easiest and most straightforward way to get your TP-Link extender up and running in no time. If your router supports WPS (Wi-Fi Protected Setup), I would recommend you use this method to pair a TP-Link wireless extender.
Steps To Follow:
Step 1: Ensure that your router supports WPS and that the WPS function is enabled.
Step 2: Plug in the TP-Link Extender near the main router.
Step 3: Press the WPS button on the main router.
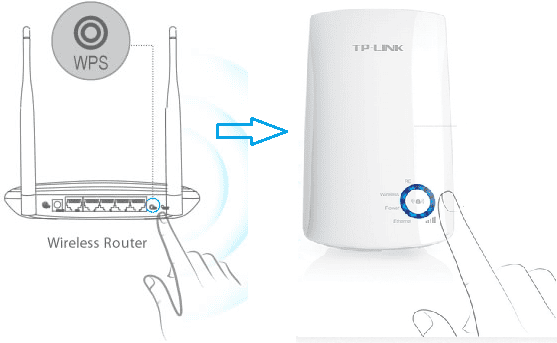
Step 4: Within two minutes, press the WPS button on the TP-Link Extender.
Step 5: The extender will automatically connect to your router’s Wi-Fi network. Once connected, the extender’s LED indicators will indicate a successful setup.
Step 6: Move the extender to a desired location for optimal signal coverage.
How To Connect To a TP-Link Extender?
Once your TP-Link extender is successfully set up, it will create a new Wi-Fi network. The network name will be the same as your router’s network name, but with the word “_Extender” added to the end.
Open your device’s Wi-Fi settings and select the network name. Enter the network password if prompted. Once you are connected, you will be able to access the internet through the extender.
Failed Setting Up a TP-Link Extender? [Common Issues & Fixes]
Here are some common problems faced while setting up an extender, along with their quick fixes:
1. Extender Not Connecting to the Internet
Make sure that it is properly set up and connected to your main router. Also, ensure that it is within range of the router. Check if the extender’s LED indicators are solid. You can restart both the extender and the main router.
If the issue persists, consider resetting the extender to factory settings and repeating the setup process.
2. Extender Slow Wi-Fi Speed
Make sure that the extender is in a central location and that there are no obstacles blocking the signal. Additionally, try changing the wireless channel on the extender’s web-based management page to avoid interference from other devices.
Ensure that the extender is not overloaded with too many connected devices, as this can impact its performance.
3. Weak or No Signal from Extender
If you experience weak or no signal from the extender, ensure that it is placed in an optimal location between the main router and the areas you want to extend coverage to. Avoid obstructions such as walls or appliances that may interfere with the signal.
4. Extender Not Working with Specific Devices
Make sure that the devices are compatible with the extender. Restart both the device and the extender to refresh their connections.
5. Connection Drops
If you are experiencing connection drops with the TP-Link Extender, make sure that it is not placed too far away from the main router. Ensure that the extender’s firmware is up to date by checking for any available updates on the TP-Link support website.
Frequently Asked Questions
Can the TP-Link extender connect to any WiFi router?
Yes, the TP-Link extender can work with any WiFi router as long as it supports the standard WiFi protocols (802.11a/b/g/n/ac). The extender is designed to work with a wide range of routers from different brands, providing extended coverage and improved WiFi signal strength.
Where should I place a WiFi extender?
The extender should be placed between the router and the area where you experience weaker signals. This ensures optimal signal strength and coverage.
Does the extender have to be in the same room as the router while setting up?
No, it’s not required. However, during the initial setup, it is recommended to place the extender in close proximity to the router to ensure a strong and stable connection. Once the extender is set up and connected to the router, you can move it to a different location where you need improved WiFi coverage.
How long does it take to get the TP-Link extender ready?
The time required for TP-Link WiFi extender setup can vary depending on the method you choose. Generally, the setup process can be completed within a few minutes to 15 minutes.
Methods like using the Tether app or the WPS button are typically quicker, while configuring through a web browser may take a bit longer due to additional settings and customization options.
What is the WPS button on TP-Link?
The WPS button on TP-Link devices is a convenient feature that allows for easy and secure wireless connections. By pressing the WPS button on both the TP-Link extender and the router, they can establish a connection without the need to enter the network’s password manually. Basically, it simplifies the setup process.
Setting up an extender from the house of TP-Link is easy and can greatly enhance your network’s WiFi range. Remember to regularly update the firmware to ensure optimal performance.