
Is your device connected to your wireless router, but have no internet access? It primarily can be because of a technical glitch on your router or due to an internet outage or maintenance. I recently faced it and was able to solve the problem, in case you're facing it, follow the fixes below.
Tip: In most cases, turning off the modem & router, removing all the cables, and plugging them back in (while ensuring they're tight enough) fixes it. However, if it doesn’t work in your case, stress not. Let's troubleshoot it together!
Reasons Why Device Gets Connected to WiFi But The Internet Doesn't Work
- Internet Outage or scheduled maintenance
- Damaged cables, splitter, or loose connections
- Physical and network interference
- Incorrect router placement
- Overloaded router/modem
- Unmonitored Background data consumption
- VPN usage
- Outdated firmware
- Limited Hardware capacity
👉 Related reading: Can You Use a Roku Without Internet?
13 Fixes That Should Solve The Internet Connectivity Issue [Updated for 2025]
Now that you know all the probable reasons, it's time to follow the sequence of steps mentioned in this section.
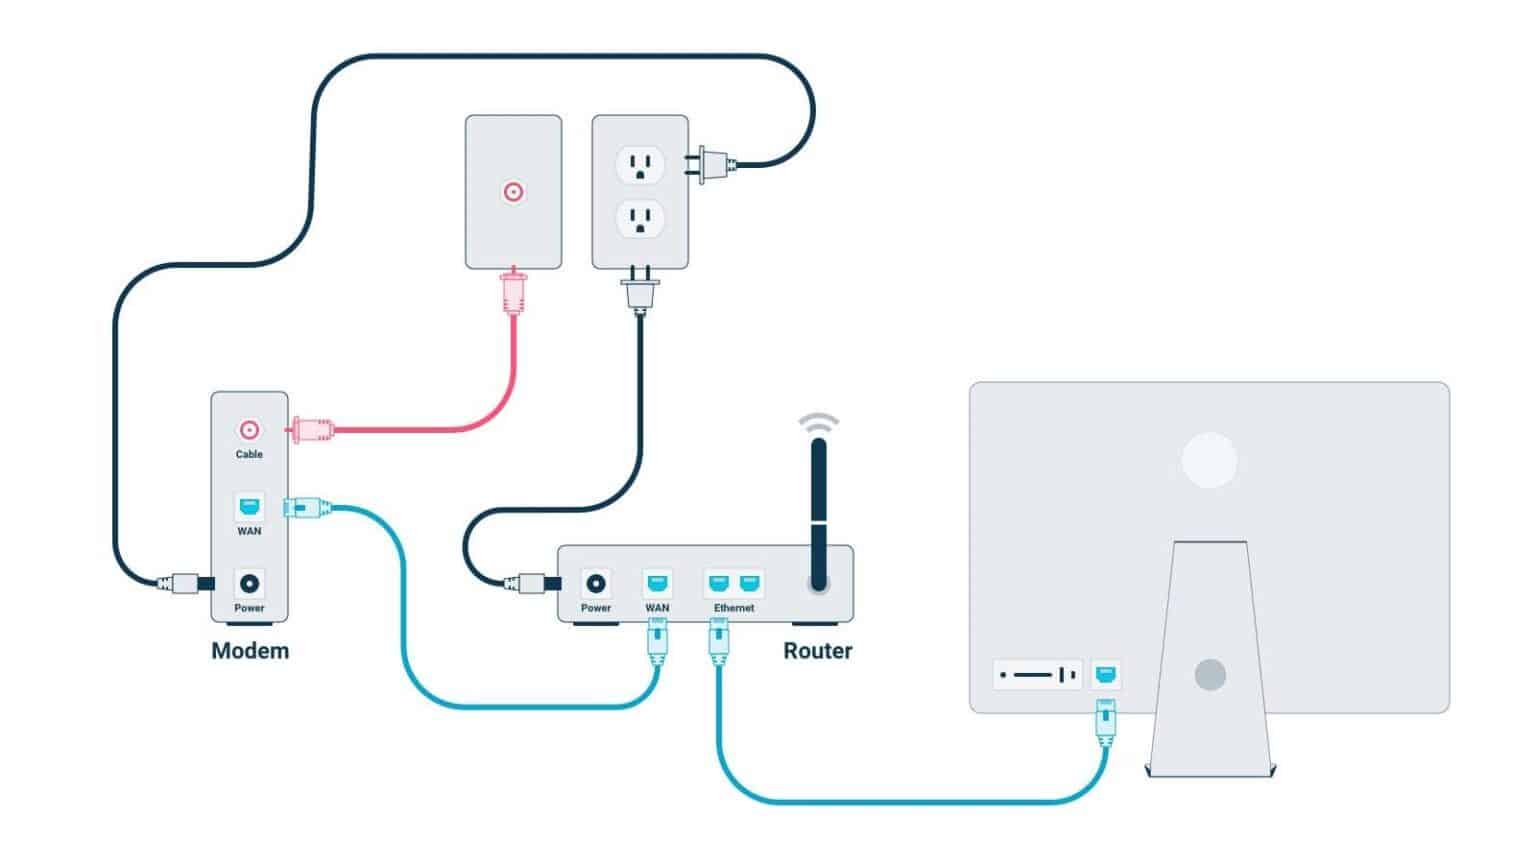
1. Power Cycle Internet Equipment
Together, the modem and router function to continually send and receive data. Due to the constant load and the amount of data packets, they are subject to random glitches and miscommunication, sometimes depriving you of a working internet connection.
Power cycling the cable modem and/or wireless router will allow them to quickly reset and solve such issues. In case you don't know, power cycling means disconnecting all devices.
Steps To Power Cycle Your Internet Equipment:
- Disconnect the modem and router from the power source
- Unplug the COAX cable from the wall outlet and all Ethernet cables connecting the modem/router to other devices.
- Let the devices rest for a couple of minutes.
- Connect the wire from the wall outlet to your modem
- Connect the power cord, and turn the device on.
- The device takes time to initialize. Wait for the lights to turn stable.
- Once the modem lights are stable, connect the power cord of the router to the wall outlet
- Connect the modem and the router with an Ethernet cable
- Turn on the router
- Wait for all the router lights to stabilize
- Check if the device is connected to the internet by running speed tests.
- If you are still facing trouble connecting to the internet move to the next course of action.
2. Check for Loose or Damaged Connections
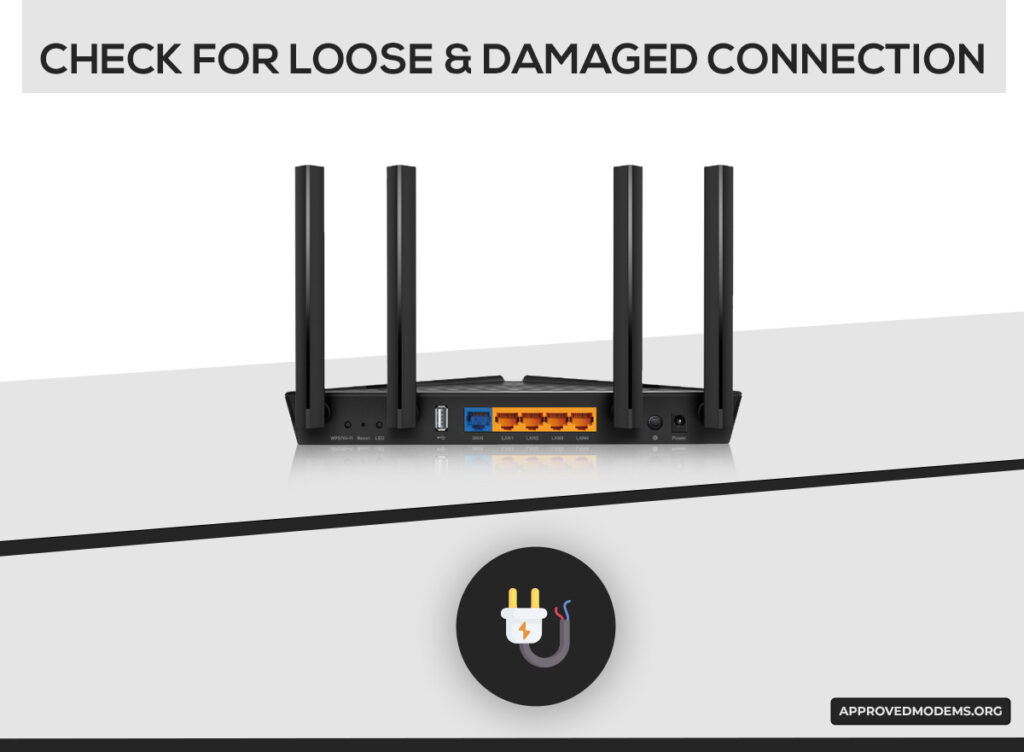
Your internet connection will be the one to suffer if any of the cables or cords involved in your setup get damaged. It can be a coaxial cable, issues with a wall outlet or damage in an ethernet cable, or loose connections/damage in the port causing internet issues.
Note: The coaxial splitter comes to play if you are using the TV/Voice bundles package.
Steps To Check for Loose or Damaged Connections:
- Check the power cords connected to the modem and the router.
- Observe for any fluctuations in power.
- Ensure the coax cable connecting the modem to the wall outlet isn’t damaged.
- Check for any moisture or water leakage in the wall outlet's walls.
- Check the Ethernet cable if you use a separate modem and router. connecting the modem and router for any apparent damage or loose connections.
- If any cables are damaged, replace the older cables with a new ones.
- Connect the wall outlet and the modem, if your modem gets connected to the internet, then it's time to replace the coaxial splitter.
3. Check for Internet Outage in Your Area
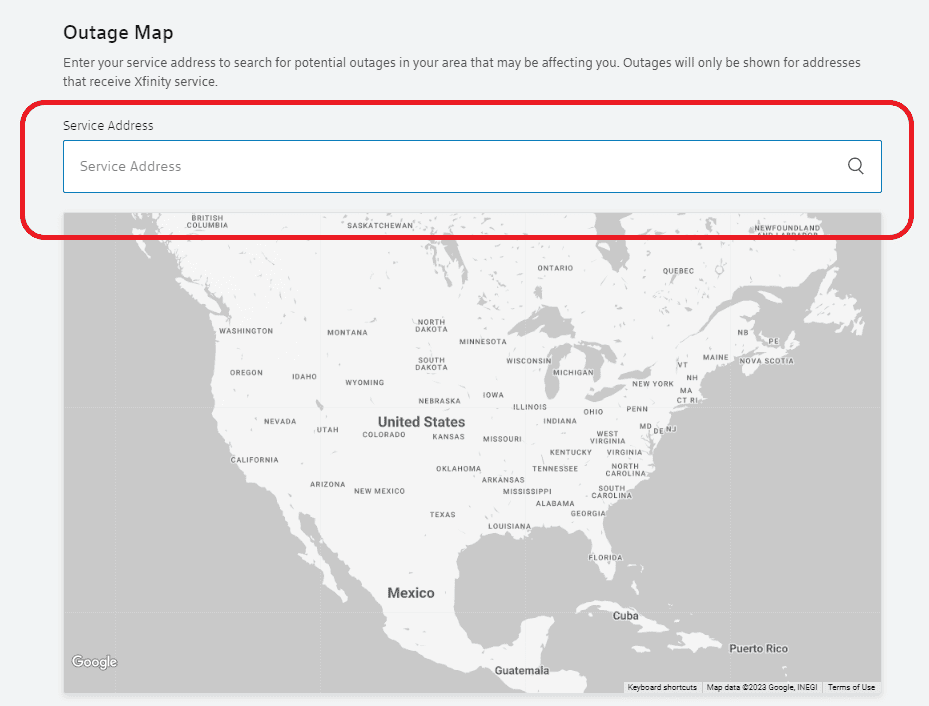
An internet outage or scheduled maintenance activities in your neighborhood can cause WiFi connected but no internet issue. Check with your local service provider for any information. Go to the ISP’s website and look for any information on the outage.
Steps To Check for Internet Outage or Maintenance:
- Visit the ISP’s portal
- Go to the service outage map
- Click on the search or input box
- Enter your pin code
- If there is any such repair or maintenance activity, you can do nothing but wait until the issue is resolved.
4. Use a Wired or Ethernet Connection
Wi-Fi connections are handy and don't confine you to a single location, yet they can become unreliable and sluggish, susceptible to physical and network interference.
If your internet connection is slow, connect your essential device to the router via an Ethernet cable. Your connection will be more stable and reliable than Wi-Fi.
Steps to Using a Wired Connection:
- Make sure all networking devices are disconnected and turned off.
- Take an Ethernet cable and plug it into the Ethernet port in your router. You’ll find it labeled as LAN or Ethernet on the rear side of your router.
- The other end of the cable gets plugged into your smart TV or PC or laptop.
- Turn the router back on. Wait until all the lights on your router go solid and check your wired devices for internet connectivity and speeds.
5. Disable or Disconnect Unwanted Devices
If you have many devices connected to the same WiFi network and you are experiencing frequent connectivity issues, you have to entertain the possibility that your networking device is overloaded and operating beyond its capacity.
Freeing up unused devices from the WiFi network will allow more bandwidth for the remaining gadgets, improving the speeds on offer. But if all of the devices must remain active, it's better to get a router that handles multiple devices.
You can individually disconnect the devices from the network. If that feels like a hassle to track and disable every device, changing the WiFi password gives you an easier way out. This will disconnect all the devices from your network and the new password has to be keyed in to get internet access.
Steps To Change WiFi Password & Disconnect Devices From the Network:
- Visit the router portal. It'll most likely be 192.168.1.1 or 192.168.0. If you are unsure, look for the URL in the router's label.
- Login using the default username and password
- Navigate to the wireless setting menu
- Get to the SSID and password input boxes for the WiFi bands
- If you have both 2.4 and 5GHz bands, edit both passwords.
- Click on save and Apply settings.
6. Remove Physical Obstructions Around The Router

One of the most common but neglected causes of WiFi is connected but not working is physical obstruction and interference.
You could be either blocking its heat regulating system or the WiFi signals might be getting blocked or hindered by furniture, appliances, mirrors, cutlery, and other electrical devices.
You can avoid this by following a few ground rules of placing a WiFi router.
Steps To Avoid/Minimize Physical Interference:
- Disconnect the router from the power source.
- Place the router on a table; a few feet off the ground.
- Avoiding covering the router with clothes.
- Don’t place books underneath or above the router.
- Keep the router away from the corner.
- Don’t confine the router in the cabinets.
- Avoid placing it behind electronic appliances such as TV, refrigerators, or microwave oven.
- Avoid reflective surfaces like mirrors, and fish tanks.
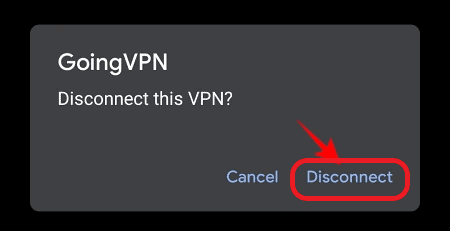
7. Disconnect or Disable a VPN
If you are a regular VPN user, it plays a role in slowing down your internet. Although VPNs provide privacy and anonymity, it comes at a cost and if your router is not fast enough, it ultimately affects the speeds available to you.
If you think it's VPN slowing down your internet. turn it off during the instances, where you cannot afford to compromise on the speeds.
Steps Involved in Disconnecting the VPN:
If you use third-party VPN applications, you can log in to the App, turn it off and continue using the internet. If you use a built-in VPN in android, iOS, or Windows applications, the steps to turn them off are pretty similar and straightforward.
- Go to the home page
- Navigate to the preferences/General settings icon
- Choose Network or Network & internet
- Scroll down and Click on VPN

- You can turn it off by changing the VPN toggle on/off or clicking on disconnect.
8. Update Router’s Firmware
The firmware your router operates on has a big impact on how well it works. If your router is using an outdated or earlier version of firmware, it's prone to affect the performance of your devices, inevitably affecting your internet connection.
By keeping the router's firmware up to date, you can ensure that it is performing to the best of its ability.
Steps Involved in Updating the Router's Firmware:
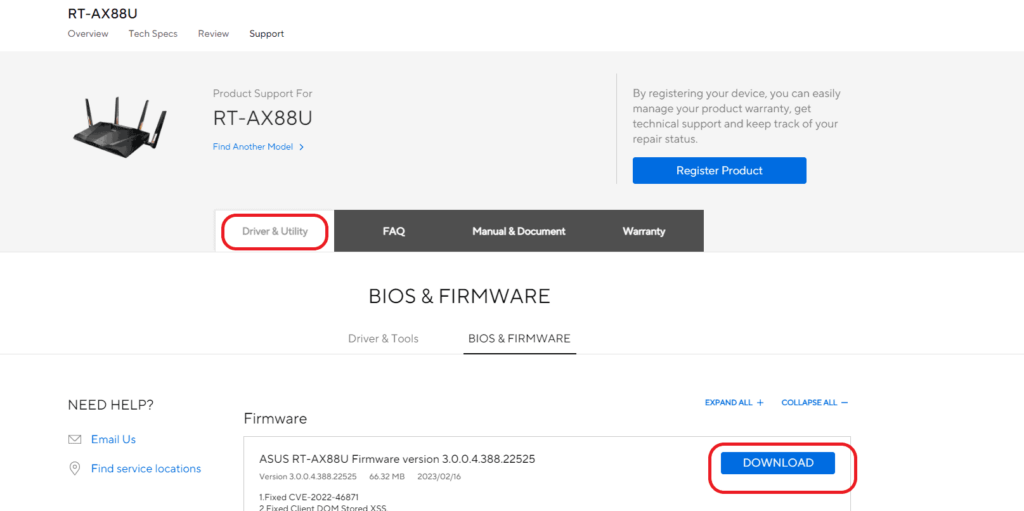
- Find the router’s model number from its label or the box it came in.
- Go to the manufacturers' official website.
- Key in the model number and search for the latest firmware.
- Download and save it on your local storage drive. i.e. hard disk.
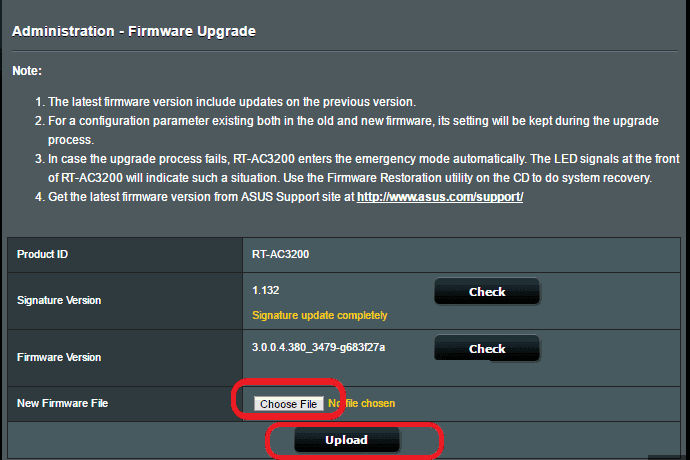
- Once the download is complete, log in to the router portal.
- Navigate to the advanced settings and choose administration.
- Map the downloaded file and click on upload.
- Don't interrupt the process. Your router will restart multiple times during installation.
9. Disable Background Data Consumption
Many apps on mobile devices may use data in the background and slow down the internet. Mobile applications download data and update content not just when you are active but even after you close them.
Disabling the background consumption might help you free up some bandwidth and improve your connection.
Steps to Disable Background Data Usage:
- For iOS devices, click on the settings icon
- Choose the general settings
- Scroll down to the Background App refresh
- This will give you the list of Apps using the internet in the background
- You can disable them individually
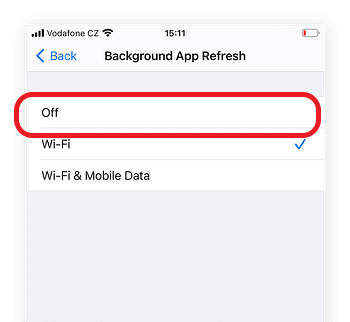
- If you want to disable it for all the applications in one go, click on the menu and choose off.
10. Schedule Downloads/Updates to Night
Your system updates, large downloads, and file transfers slow down the device and network. By scheduling these activities for the night, you'll save the hassle of slowing the network during the daytime.
Steps Involved in Scheduling Updates and Downloads at Night:
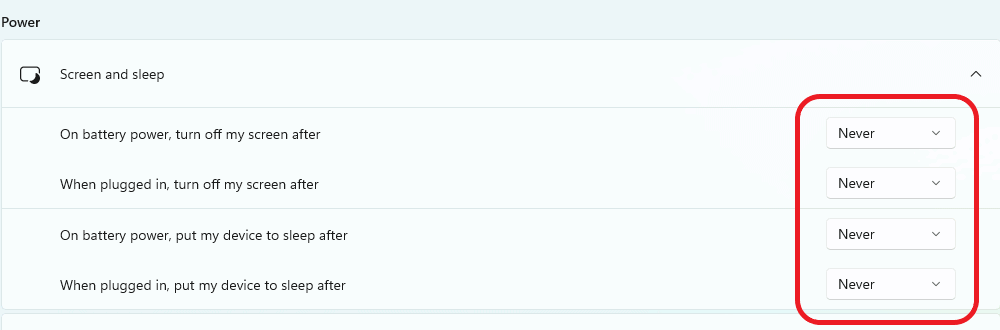
- Click on settings, navigate to System, and choose the power and battery settings.
- Change the screen and sleep option to never.
- On the settings, click on Windows update, closer to the end of the menu.
- Choose advanced options from the page
- Change the active hours accordingly.
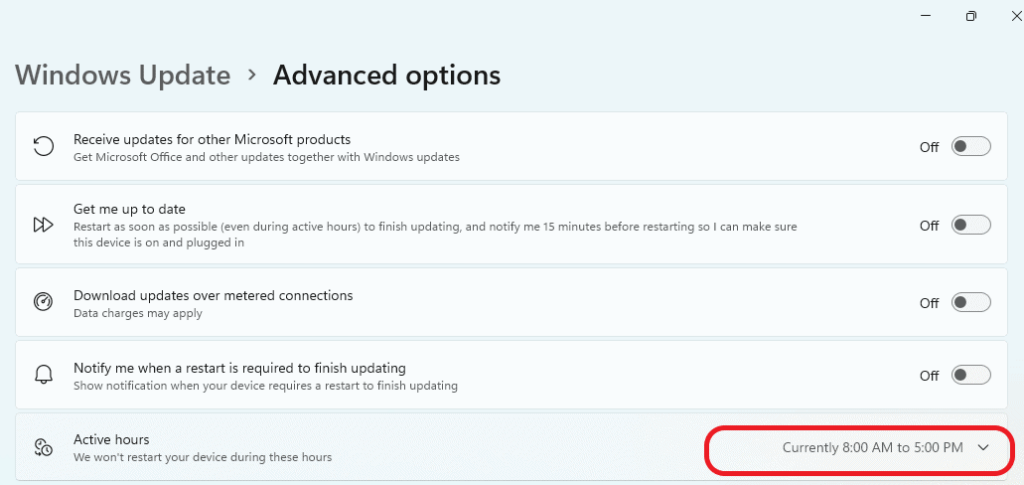
- This will automatically schedule all OS updates and downloads in that time window.
11. Switch Frequency Band & Play with WiFi Channels
The astronomical rise of smart devices has made the 2.4 GHz congested, which impacts connectivity. Switching to 5 GHz can help you mitigate the issue.
You can mix and match with changing the WiFi channels (20, 40, 80, 160) to get the most out of your internet. Use a WiFi analyzer to find the least congested channel and use it to change the channel your router is operating on.
Steps Involved in Switching Frequency Band and WiFi Channels:
- Visit and login into the web portal
- Move to the wireless settings
- Choose the least congested channel by changing it from Auto on the 2.4GHz or 5GHz
- If your router has a smart connect feature, turn it on. This feature will allow your router to automatically switch between frequency bands, depending on the levels of network congestion.
12. Reset Modem & Router
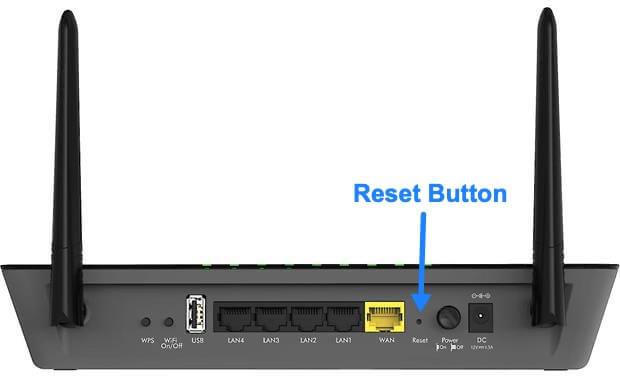
If the WiFi has no internet access still persists, some of the older settings in the router or modem could be the reason behind it. Resetting the modem & router will refresh and clear the settings and help you in improving the overall performance of the network.
Steps to Manually Reset the Modem and Router:
- On the rear end of the networking devices, look for a pin-sized hole labeled as reset
- Insert a pin and hold it for 10-15 seconds.
- Once you see the lights flash, you can let go of the hold
- The manual reset will take anywhere between 10-15 minutes and will return your device to factory condition.
- Once both the modem and router are reset, you can configure and connect them to the internet.
13. Upgrade Your Internet Equipment
If any of the steps mentioned above, hardly improved your internet connectivity, it could be an indication that the networking devices are not up-to-date. You can choose to request an upgrade with your ISP or invest in your equipment.
Steps to Upgrade your Equipment:
- Contact the customer support
- Explain the history of connectivity issues and request for a technician visit and device upgrade
- If you have been a customer for a prolonged period, you might be eligible for a free upgrade.
Frequently Asked Questions
There are multiple causes for the issue of being connected to WiFi but no internet. It could be anything from an internet outage or service maintenance interruption to damaged cables or outdated equipment.
A manual reset on your WiFi router will reset all the network settings. This will allow you to get rid of any redundant information on the router and clear up its storage memory.
Conclusion
You can often solve the issue by giving little attention to the details mentioned in the article. If you are not confident in taking up the issue, dial into customer care right away and let them take care of it.