
In this post:
- Calculating the Right Amount of Concrete
- What’s Better: Concrete in Bags or a Ready-to-Use Mix?
- Tips for Proper Concrete Needs Calculation
- The Importance of a Safety Margin: Why You Should Never Underestimate Concrete Calculations
- Asking Supplier Company Representative to Visit the Site
- Pouring Concrete Guide: The Next Big Job
- Take Care of Your Cured Concrete
Working with concrete needs experience and theoretical knowledge. While you might be a professional, sometimes measuring the right amount using your eyes isn’t the right choice. There are special guidelines for calculating the exact amount needed and actually pouring the concrete. We’ll try to tell you as much as possible in an easy-to-understand way.
Calculating the Right Amount of Concrete
The easiest way to calculate the right amount of concrete is to use an online calculator.
Concrete Slabs Calculator
[stm-calc id=”1478″]Concrete Footings Calculator
[stm-calc id=”1477″]Concrete Columns Calculator
[stm-calc id=”1476″]Surprisingly enough, there are such things on the Internet, and they help thousands of specialists with the numbers. This is a great choice if you don’t have time to make the calculations yourself using formulas. Or, if you don’t have a lot of experience and are afraid to mess up an important project, this tool will also be very useful.
However, it’s still important to know the formula for the calculation.
Concrete Calculating Formula
Here’s how you make it clear how much concrete is needed for the job:
- Find out the thickness of the layer you will need;
- Find out the width and length of the area you will need to pour that layer on;
- Find out the square footage by multiplying the two measurements (width and length);
- You’ll get a measurement in inches, now transfer it to feet;
- Now, you have to know the cubic feet measurement; for that, take the square footage and multiply it by the first measurement (the thickness of the concrete layer, also in feet);
- As a result, you will need this calculation in cubic yards, so multiply cubic feet by 0.037.
It’s quite easy if you get some experience with the calculations. Basically, you need to find out the volume and convert the result into cubic yards. Then, you may need to know how many bags of concrete you’ll need in order to cover the area. For this, there are special yields per bag size.

What’s Better: Concrete in Bags or a Ready-to-Use Mix?
One of the most frequently asked questions is whether a ready mix or regular bagged concrete is better. This depends on the job you need to do and the area you have to cover. If you have a large project, say, a whole driveway, basement or porch, it might be a better idea to order the exact amount of ready-to-use concrete. This will make the work much easier because you’re using a mixture already instead of spending time mixing a bag after another.
However, if the project is small, like a regular patio, it’s more beneficial to make bag-inclined calculations and order concrete pre-mixed.
Here’s when it’s recommended to order bags:
- If you need to cover patios, sidewalks, and other relatively small areas;
- If you need to set a post for a mailbox or a fence;
- If you need to make small repairment of a wall, steps, or other similar elements;
- If you need to pour a deck, a wall, steps, ramps, curbs, etc.
When you order a lot of bags, there’s a possibility of home delivery. However, if you only need a couple, think about the means of transportation you can use to take it home. Besides, prepare the equipment you’ll need to mix the concrete. If you don’t have a mixer but really need one, there’s an opportunity to rent it. Find out if there are local services that can cover your needs. A wheelbarrow should work as well if you don’t have a large number of bags to mix.

And here’s when it’s recommended to use a ready mixture:
- Foundations, pool decks;
- Large patios and driveways;
- Large commercial sidewalks;
- Parking lots.
Make sure you have clear calculations before ordering concrete by the yard because the manufacturer will need the exact number.
A lot of companies have a limit for a minimum order, so find a company that will be able to give you just as much as you need (maybe a little extra, just in case). Such mixture is delivered by trucks, and one such vehicle can carry around 9-11 yards. If you need more, several trucks may be needed, therefore, more money for the delivery.
Tips for Proper Concrete Needs Calculation
Here are some of the best tips that will help you calculate the needs for the concrete as precisely as possible:
- There’s a golden rule. Take one-fourth of the slab thickness and add it to that thickness; this will be the amount of concrete you will need. But do it only if you have the right initial calculations; if possible, check the measurements;
- In case you have a 4″ spot and 4.5″-5″ spots, it's better to fix the measurements just for the final quality of the result;
- In case you have an odd shape to figure, it's much easier to do if you make it a rectangle. The calculation will be much easier then;
- If calculating for footings, make sure you have the true width. They might not be like what you see in the project. The soil can correct the needed amount of concrete;
- There are lots of other factors in calculating footings. Digging too deep, weather conditions, all of this should be included in your calculations;
- If possible, measure different spots in your footing to compensate for the uneven or rocky soil, etc.;
- It's better to have more than necessary instead of having to order more mixture or bags of concrete later on;

When calculating concrete needs for steps, you may think there's a lot of work and measurements. In reality, it's quite easy. For example, let's say you have three steps leading to the door or porch:
- First of all, calculate concrete needs for the porch or entrance. The easiest way to do this is still an online calculator;
- Then, measure the sides of the porch/entrance and the steps. There are special footing calculators that will help a lot here;
- If you have added step layers, repeat the same algorithm.
The Importance of a Safety Margin: Why You Should Never Underestimate Concrete Calculations
Never ever order just the amount you have calculated. This is one of the most frequent mistakes. People do it to save money and not spend more on what might not be necessary. However, in most cases, the need for concrete increases during the construction for various reasons.
The best order would have one spare cubic yard per 20 ordered cubic yards. You might think this is just spending too much money on concrete. However, it will cost you much more if you are short on the material.
Here are just some extra costs you will have to pay:
- Extra working time for the crew while they're waiting for the additional order;
- An additional charge for small order and delivery from the company you're ordering at;
- A compensation (if possible) for the cold joint. This is when it's visible when one pour has ended, and a new one has begun later.
The construction will take more time, money, and effort, so it's always better to order a little bit more.
How to Order Enough Concrete

Follow these 3 steps to order just enough concrete for the job:
- Use a reliable calculator for your concrete needs;
- Learn what the depths and widths of the areas are in reality, not on the plan;
- Add a margin of safety according to the golden rule.
The Golden rule is the following:
- If you order 1 to 5 cubic yards, add 0.5 to 1 cubic yard more;
- If you order 6 to 10 c.y., add about 1 more;
- If you order 11-20 c.y., add 1 to 1.5 c.y. more, etc.
If the extra concrete isn't needed, don't get frustrated. You still have saved yourself worries and achieved the best result quality. Having some left might inspire you to do something extra or repair some things that haven't been done in the best way. You will still have to pay for that leftover concrete, so it's also useful to do something with it.
Asking Supplier Company Representative to Visit the Site

It's very helpful to invite a representative of your ready mix supplier to estimate your concrete needs. They will provide you with valuable insight and help make the right estimates. They will also see how the truck can enter in the most convenient and safe way.
You can compare your measurements to what the representative says just to be sure you're ordering enough. And don't forget about the safety margin.
The supplier will help you a lot, so don't underestimate their expertise. They will check the condition of the site, notify you about any local restrictions or rules you should follow to not get into trouble.
They can show you issues you may not have noticed before and provide a fresh overall look of the site. So take your time to find a reliable supplier and ask a representative to check everything.

Pouring Concrete Guide: The Next Big Job
While measurements and calculations are imperative for the success of the project, even the larger part of the job is still ahead. Using concrete is always a challenge due to the different pours, sizes of the areas, colors, needed finishes, weather conditions, the complexity of work.
The list can go on and on, so it's clear the challenge is quite difficult. To help you get familiar with the process, we have created this convenient and easy-to-understand guide. It contains 8 steps minus the calculation (we've talked enough about it).
So let's say you've ordered just enough concrete for the job, with the margin of safety. You have talked to the supplier and got their “blessing” for the job.
Here's what to do now.
Step 1: Preparing the Site

Before you start pouring, it's clear that the area has to be prepared. It's done to reduce the danger of heaving. It's a frequent situation. Some people think that if the area is filled with concrete, the debris, frost, expansive soils, etc. shouldn't be a problem.
In reality, the site has to be cleaned and prepared. If it's a small area, you can use simple tools to remove branches, leaves, grass, rocks, older rains of concrete, etc. The more you remove, the better.
If you have a large area or are short on time, there are special tools for earth moving.
The next step in preparing the soil is making a base for the concrete on it. Usually, it's compacted gravel. However, if the soil is very solid and compact, it's possible to skip this step.
Step 2: Forming the Area

The next step after you create the base for the pour is setting forms. In residential projects, it's recommended to use wooden forms with wooden or metal stakes, depending on your needs and budget.
Attach the forms in a way you can easily remove them. Screws can be used or nails that can be removed when necessary. You'll need to take the forms out after the concrete you pour is already cured.
Make sure that the forms are of high quality and are set properly. They guarantee the right slope and clean corners. As a result, the cured pour should be able to align with the nearby structures.

You can find out more about the different types of such concrete forms online or in construction manuals.
Step 3: Concrete Mixing (Optional)
If you've ordered bagged concrete for the project, you'll need to mix it. It should be mixed with water in the ratio mentioned in the manual or package instructions.
In case you have a small project and low concrete needs, using a wheelbarrow and a shovel will be just enough. To make the process easier, it's worth renting a concrete mixer. There are small mixers that will make the process faster and allow for a better mix at the end.
In case you've ordered a ready mix, it arrives in the mixer already spinning to avoid premature setting and hardening.
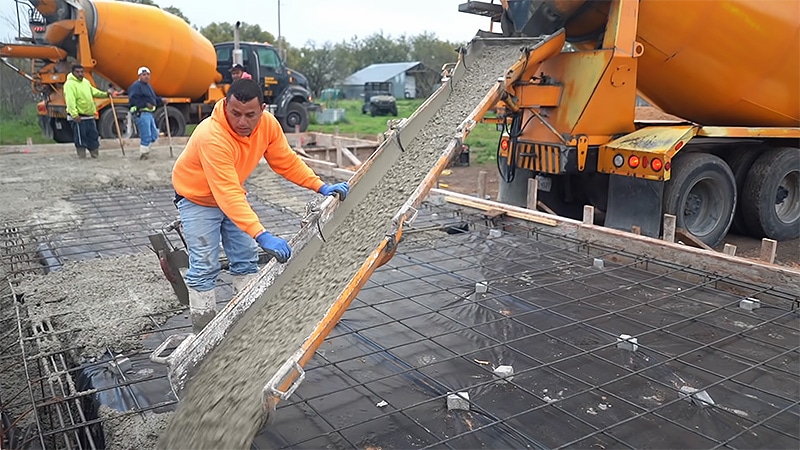
Step 4: Concrete Placement

Time to pour! Do it until the forms are full without overspill. While pouring, it's necessary to distribute the concrete properly with shovels or rakes. This will make sure you have no pockets with air, empty corners, or empty spots in the form.
You should do it while pouring to process every air pocket until it's formed. It's much more difficult to do it when you've already filled the form. Act fast to achieve the best results.
Step 5: Compacting the Concrete
Using a large board made from metal or wood, screed the top of the pour you’ve just made and distributed. This will start the smoothing and further distribution processes and make the concrete more compact. To improve, using a float for more compacting and evening is very helpful. There are different floats for different areas.
Small floats you can use with your hand are great for the small details and corners. There are also large floats that can cover a very wide area in one go. Using both will help you achieve a perfect result. This process is called the early finish of the concrete.

Step 6: Concrete Troweling (Optional)
This is an optional step because if you finish concrete with a broom, no additional steps finish-wise might be needed.
But in other cases, proper troweling will improve the situation a lot.
Wait until the surface begins to firm up, and once the process begins, use a large steel trowel to create a smooth finish. You can try to cover a small area once and go area by area. There are also trowels on long poles you can use to cover larger areas.
Troweling guarantees a hard and smooth finish, so it’s worth considering.
Step 7: The Final Concrete Finish (Optional)
The final finishing will give the concrete a textured surface. It’s usually done with a special broom (therefore called the broom finish). You’ll get a rough surface suitable for future work on the concrete. You can use other finishes like a smooth trowel (like in Step 6), textured, or stamped finish. There are lots of different finishes, and all of them are needed for a certain situation. Make sure you choose the right one for your construction.

Step 8: Concrete Curing (Hardening)
After all the finishes, the concrete is already a bit firm. However, it has to cure completely. For that, let it rest for 48 hours. Keep in mind, though, that the whole curing process lasts for about 28 days; however, the first two are the most important.
Make sure nothing falls, or nobody steps on the surface within those two full days.
To avoid cracking while curing, you can apply a chemical solution onto the surface. The curing will then be slow yet very even, without any damage. Light steps are allowed after 3-4 days of curing, but it’s better to try and see first. After roughly a week, you can already ride and park on the concrete.
Check this guide on Basement Concrete Floor Paints.
Asking Professionals to Take Care of Your Concrete Work

If your project requires difficult calculations and a lot of experience in mixing and pouring concrete, it’s highly recommended to find reliable contractors. While an easy project is doable even if you don’t have much experience, a difficult one or a large area calls for professionals.
You can make companies bid on your project and see which one offers the best conditions of cooperation. Consider experience, portfolio, credentials, prices, scheduling, etc. Conduct interviews, and don’t hesitate to refuse if something isn’t good enough.
Recommendations to Achieve a Perfect Pour
Here are general recommendations and facts you should know to make sure the result will satisfy you:
- One yard of concrete must contain at least 470 lbs of cement if this is a residential project. This is the minimum standard, no matter what area you build in;
- If you live in a climate that gets freezing in winter and hot in summer, it’s wise to add at least 4% of an air-entraining mixture to the concrete. It will help the pour withstand rapid changes in temperature and humidity;
- The ready mixture truck should be able to enter the site and pour right where you need it. If not possible, you can rent wheelbarrows and pour from the truck there to transport the concrete to where you need it;
- Don’t work with concrete if it’s colder than 20F. It will take much more time for the concrete to cure in cold weather, and the danger of premature damage also increases;
- If it’s necessary to pour concrete in temperatures less than 40F, make sure you have enough curing blankets for the first several days to a week of curing. They will help the concrete harden by providing warmth.
These tips are very easy, but sometimes even experienced specialists neglect them. If you want a perfect pour, don’t underestimate the weather or the quality of the mixture.
Take Care of Your Cured Concrete

If you mix, pour, finish, and cure concrete properly, it will serve you for decades without damage.
Concrete is one of the oldest materials used in building. It’s been a helper for thousands of years and is still one of the best choices for all kinds of constructions. Making sure you follow all the basic steps and guidelines and asking professionals for help when needed is important if you want your concrete to serve you for long.


