Ring Doorbell Jumper Wire - What It Is and How It Works

When I first installed a Ring Video Doorbell, I ran into a small but important piece in the box—the jumper cable. At first, I wasn’t sure if I needed it, but after reading the instructions, I realized it was necessary for my setup. If you have a mechanical doorbell chime, this tiny wire helps your Ring Doorbell get constant power by bypassing the old chime.
If you’re setting up a Ring Video Doorbell Wired, you’ll probably need this cable. But if you have a digital chime or no chime at all, you won’t use it. Let’s take a look at what the jumper cable does, how to install it, and what to do if you still want to hear a chime inside your home.
👉 Don’t miss: Best Smart Home Devices in 2025
What Exactly Is a Ring Doorbell Jumper Cable?
The Ring Doorbell jumper cable is a small wire that helps power certain Ring doorbells by bypassing a mechanical doorbell chime. It connects inside your existing chime box and allows the Ring Video Doorbell Wired to get a steady flow of electricity.
Mechanical chimes work by using an electromagnet to strike metal bars in order to produce a sound. When you install a Ring Video Doorbell Wired, the built-in chime no longer works because the doorbell needs constant power. The jumper cable bridges the connection so your doorbell gets the power it needs without relying on the chime’s wiring.
Do I Need a Jumper Cable?
Not every Ring Doorbell installation requires a jumper cable. Whether you need it depends on what you already have.
You need the jumper cable if:
- You have a mechanical doorbell chime (a box on the wall with a physical striker that hits metal bars).
- You are installing a Ring Video Doorbell Wired and want it to receive continuous power.
You don’t need the jumper cable if:
- You have a digital chime (one that plays an electronic sound or melody). Digital chimes require a different Ring Chime Connector instead.
- You have no existing doorbell chime and are wiring the Ring directly to a transformer.
- You are using a battery-powered Ring Doorbell with no wired connection.
If you aren’t sure what kind of chime you have, take off the cover and check. A mechanical chime has physical moving parts, while a digital chime is just a speaker. If you don’t see any of these, you probably don’t have a chime at all.
If you want to purchase a new jumper for your Ring Doorbell, you can find them on Amazon for just a few dollars.
How To Install the Jumper Cable
You can install the jumper cable in a few basic steps:
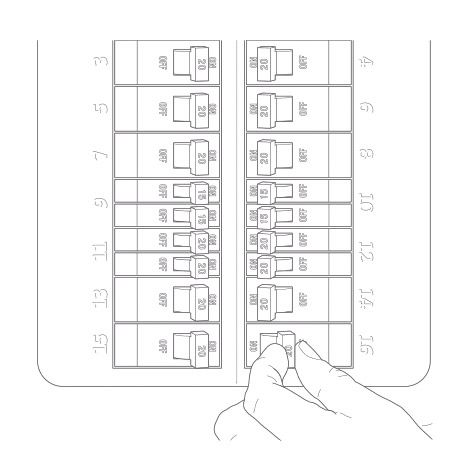
- Turn off power at the breaker
- Open the chime box
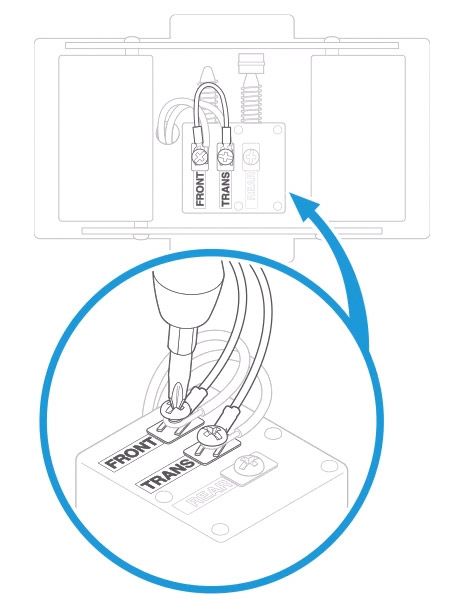
- Locate the front and trans terminals
- Connect the jumper cable
- Close the chime box
- Restore power
Before installing the jumper cable, you need to locate your existing doorbell chime. Press the doorbell button and listen for the sound. If you hear a chime, follow the noise to find the chime box. This is usually in a hallway, near the front door, or in a utility area. If you don’t hear anything, you may not have a chime or it might not be working.
👉 Related reading: Guide to Ring Doorbell Screws
Once you find the chime, turn off power at the breaker. If you’re not sure which breaker controls the doorbell, turn off the main breaker to be safe. This prevents electrical shock while working with the wiring.
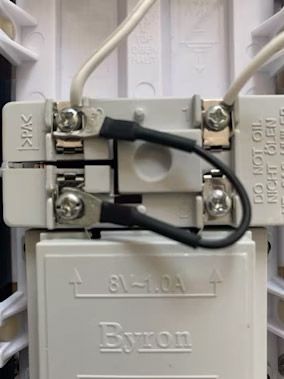
Next, open the chime box and locate the front and trans terminals. These are the connection points where the jumper cable will go. Grab the included jumper cable and connect one end to the front terminal and the other to the trans terminal. This bypasses the chime, allowing the Ring Doorbell to receive uninterrupted power.
After securing the jumper cable, close the chime box and restore power at the breaker. The Ring Doorbell should now have power, and the chime inside your home will be disabled. Many Ring users purchase a chime so they can hear the doorbell ring.
👉 Related reading: What’s the Difference Between Philips Hue Bridge 1 and 2?
Troubleshooting Common Issues
If your Ring Doorbell isn’t working after installing the jumper cable, make sure the jumper cable is securely connected to the front and trans terminals in the chime box. Loose connections can cause power issues.
If the doorbell isn’t receiving power, make sure the breaker is turned back on and that you have enough voltage. Ring recommends 16-24V for wired installations.
If your mechanical chime still makes noise after installing the jumper cable, double-check the connections. The chime should by now be completely bypassed, so if it’s still making a sound, the cable may be installed incorrectly. If your Ring app shows no power or low voltage, use a multimeter to test the transformer output. Upgrading the transformer may be necessary if the voltage is too low.
👉 Related reading: 7 Best WiFi Extenders for Ring Cameras
Wrapping Up
The jumper cable is a simple but necessary step for installing a Ring Video Doorbell Wired with an existing mechanical chime. Just remember that it keeps the doorbell powered while bypassing the chime, which means you won’t hear it ring inside a Ring Chime or Ring Chime Pro.
Trying to choose between Ring Chime and Chime Pro?
Both chimes plug into a regular outlet and play customizable sounds for your Ring doorbells and cameras. The Chime Pro has extra features, including extended Wi-Fi coverage, a built-in nightlight, and support for both 2.4 GHz and 5 GHz Wi-Fi.
Continue reading: