Kasa’s line of products have been a popular budget option for those seeking affordable smart home devices. These smart devices work the same way as other popular ones from big brands – but at a fraction of the cost.
However some people have an issue with the Kasa application: due to concerns over privacy, and the app frequently requiring your location. Because of this, many have wondered if they could get away with not using the app at all.
Most devices require the use of their respective apps to function. Ring needs the Ring app, Arlo needs ArloSecure, etc. – but is this the case with Kasa as well?
Key Points
- Many Kasa devices support local control, which means the Kasa application can be skipped… in theory.
- In practise, unless you are fairly technical, you will still need the app during initial setup.
- Thankfully though, once setup is complete, you can then skip the Kasa app.
- Amazon Alexa, Google Home and SmartThings all work well with Kasa products.
An Overview of Kasa

Kasa is a division of their parent company, TP-Link, which also makes other internet, or smart devices, such as Wi-Fi extenders. Kasa’s smart home devices also come in a wide range of options. Their line includes devices such as smart plugs, switches, bulbs, and even cameras!
All these devices from Kasa work using a Wi-Fi connection. This allows the devices to connect to the Kasa application. It’s to be noted, however, that the majority of Kasa products only work with the 2.4 GHz band of Wi-Fi. So even if you use a network with multiple bandwidths (i.e. dual-band or tri-band network), make sure you only use the 2.4 GHz band for your Kasa.
To control your Kasa product, you'll usually need the Kasa app. This is where you can set up your Kasa devices, as well as configure their different functions. You can also create lighting schemes and schedules.
Kasa is also compatible with different smart hubs such as Amazon’s Alexa, Google Home, and Samsung Smart Things. This allows you to have your Kasa devices work in harmony with your other devices.
So now that your interest is piqued, you may want to try out a Kasa device for yourself. If so, how do you set one up? Do you really need the Kasa app?
Is The App Required When Setting Up Kasa Devices? (Kasa Devices Without Kasa App)

Setting up a Kasa device is relatively simple using the most common method – the Kasa app.
To do it this way, you’ll first need to download the Kasa app from the Google Play or Apple’s App Store – depending on your operating system.
Next, if you don’t have one already, you’ll have to create an account in the Kasa app. This will make sure all of your settings will be saved, even if you have to log in from a different location or device.
When you open the app and begin to use it, make sure that your smartphone or other mobile device is connected to a 2.4GHz Wi-Fi network. After this, you then connect your new device to a power source. For example, if you’re trying to set up a Kasa smart plug, you’ll make sure to plug it into a power strip outlet.
Then, from your Kasa app, select Devices, then Add a Device. From the list, choose the device you’d like to set up (i.e. Kasa smart plug). Follow the on-screen instructions and prompts to finish setting up your device.

Some people, however, don’t like the idea of using the Kasa app to set up their Kasa devices. There are two common reasons for this: firstly, they don't want to create an account with TP-Link, and secondly they don’t want to give Location permission to the Kasa app.
But is it possible to use another method to set up your Kasa device?
Using Home Assistant Or Local Scripts
If the Kasa app isn’t your thing, some have used Home Assistant, with mixed success, in order to set up their Kasa devices. During setup, many Kasa devices broadcast their own local network to facilitate the setup process.
Because of this, some smart home owners use Home Assistant to connect to this network, in order to complete setup. To do this, however, you’re going to need a decent amount of technical expertise. Like – a lot.
This is because it involves some coding, as well as running scripts. You’ll essentially be using a downloaded Python code, in conjunction with Home Assistant in order to connect your home’s Wi-Fi directly to the Wi-Fi coming from the Kasa device, like their smart plug for example.
Alternatively, some users have tried connecting to the device directly with Python scripts from Github. In general, people haven't had consistent success with this approach either.
Because of the many steps it would take, if you aren’t tech-savvy to this degree, it may be more trouble than it's worth. For that reason alone, many have decided to just use the Kasa app for the initial setup.
But now, what about daily use? Do you absolutely need the Kasa app for that as well?
Do You Need The App For Daily Use of Kasa Devices?
Initially setting up your Kasa device in the Kasa app is highly recommended, mainly because of its simplicity, especially if you aren't tech-savvy. Everyday use, however, is a different story. Integrations with smart home hubs have made it possible to use your Kasa devices in many ways.
For example, you can add your Kasa device to the Amazon Alexa app and use it in smart home integrations with your Echos. You can even create Routines that involve your Kasa devices – all without even having to touch the Kasa app!

The same goes for other smart home hubs such as Google Home, Home Assistant, and Samsung SmartThings. Kasa has even recently introduced Apple HomeKit support with their smart plugs. These are, thus far, the only Kasa products that can be integrated into the Apple Home ecosystem. So how do you use Kasa with your smart home hub?
Using Kasa With Amazon Alexa/Echo
As with most devices and Alexa, once you’ve set up your Kasa product in the Kasa app, you’ll need to add it to your Alexa app.
You do this by going to your Alexa dashboard, then to Devices at the bottom of the screen.
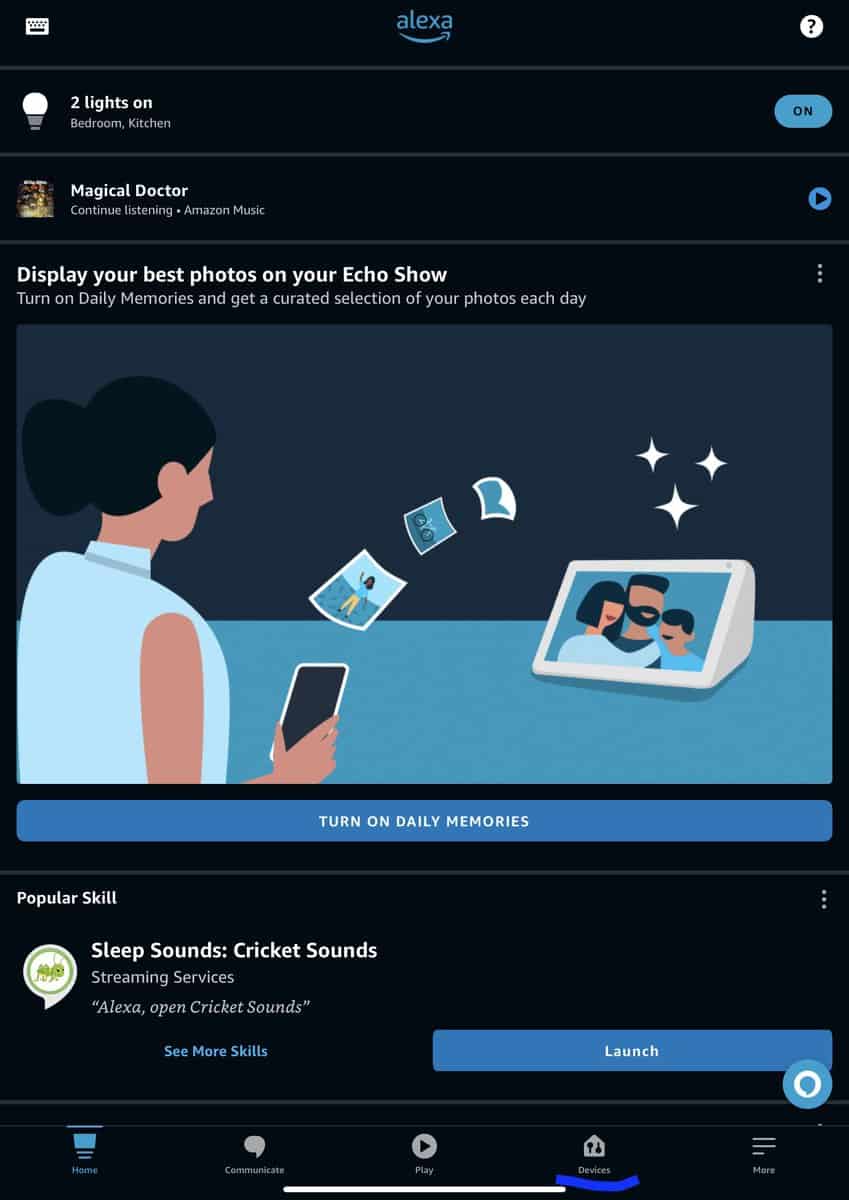
You’ll then tap on the plus sign (+) in the top, right-hand corner of the screen. This enables you to begin the process of adding a new device to your Alexa app.
Most of the time, if you already use Alexa and the Echo, when a new device is set up on your Wi-Fi network, Alexa will detect and automatically add it. If it doesn’t, or you just want to do so manually, though, you can.
Once the device is set up, for proper functionality, you’ll need to download the Kasa Skill. You'll start by going into More, at the bottom of the Alexa dashboard, then to Skills & Games.

You'll then search for and Enable the TP-Link Kasa skill. This will enable you to link your Alexa and TP-Link/Kasa accounts so that your devices work together seamlessly.

After this is done, you can go ahead and start using Alexa, even with voice control commands via the Echo, to use your Kasa devices however you please.
Using Kasa With Google Home

Another popular smart home ecosystem that’s compatible with Kasa, is Google Home. To connect a Kasa device to Google Home, you’ll first have to open the Google Home app, then go to the plus “+” sign in the top, left-hand corner of the screen to add a device.
On the next page, tap “Set Up Device”. Then, tap on “Works With Google.” From there, go to Search, and look for Kasa.
You’ll see TP-Link/Kasa show up as a search result. Tap on that option. You’ll soon be prompted to sign into your Kasa account in order to Authorize the connection between the Kasa app and Google Home.

From there, you’ll be able to see your Kasa device among your other Google Home devices. You can then select a room or area that you’d like to assign the Kasa device to.
Using Kasa With Samsung Smart Things
Samsung Smart Things is also popular with Kasa – but with one limitation. You can’t use the Kasa camera as it doesn’t support SmartThings. This may or may not change in the future. For now, compatibility is mainly with Kasa switches, smart plugs, and lights.
Just as with most smart home hubs, you’ll start by downloading the SmartThings app – most Samsung smartphones already have it installed. The next step is to create or login into your SmartThings account.
On the Home screen, you’ll see a plus “+” sign in the upper, right-hand corner of the screen. Tap on that to begin the process of adding a Device.

The first thing you’ll be prompted to do is search for the device by brand. Once you’ve searched for and found TP-Link/Kasa, tap on that. On the next screen, you’ll select the Kasa device that you’re trying to install.
Follow the prompts to sign in and authorize a link between your Kasa app and SmartThings. Once you’re done, and your device is added, you can now add it to the room or group of your choice in the SmartThings app.
When You Need The Kasa App
Using the Kasa app to setup, and even use your Kasa smart devices daily can be optional. However, the only time when it isn't optional, is when it comes to Firmware version updates.
These are updates to the inner workings of your Kasa devices. Whether it's a bug fix or a security enhancement, the only way you can keep your Kasa devices updated, is via the Kasa app.
To perform a Firmware update, from the home screen of your Kasa app, go to “Me” on the bottom right-hand of the screen.
The following screen will show you the option for Firmware Update. Once you tap on that, you'll see if any updates are needed or available. Perform these updates to make sure your Kasa product stays running with the latest enhancements.

Ditching the Kasa App
Skipping out on using the Kasa app entirely is a daring, if not near impossible, feat. Using it for setting up Kasa devices is ideal, and for updates, it's necessary. Fortunately, though, there are ways to get around not having to use it all the time.
After setup, using smart home hubs such as Amazon's Alexa/Echo, Google Home, and Samsung SmartThings can make the Kasa app, at least for daily use, unnecessary.


