
Sometimes there are ceiling fans, lighting fixtures, or other ceiling features that prevent placing your projector on the centerline of the screen. This isn't automatically a dealbreaker, though installing a projector off-center of the screen, at an angle, does have some complications.
Can a projector be used at an angle? If the projector is angled towards the screen, instead of being centered in front of it, images will be distorted. However, you can use the built-in keystone correction to correct the image angle.
There are a lot of variables to consider if you’re using the projector at an angle, but luckily the built-in keystone correction feature is easy to play around with. With a little effort, you make an angled projector work for you.
Possible Issues with Using a Projector at an Angle

Whether you’re setting up a projector at home, work, or anywhere else it’s not always possible to have it centered perfectly at the screen. When this occurs, you’ll find yourself trying to use the projector at a slight angle, pointed at the screen from the side. If you have to set a projector up this way, some of the problems you may encounter include:
- The keystone effect. When the on-screen image has a trapezoid shape, it is referred to as the keystone effect. The distortion occurs when the projected light is hitting too high or low on the screen. It will look like one half of the screen is too short, while the other is too tall.
- Glare or hot-spotting. When a glare or bright spots on the screen make images difficult to see, it’s often due to using the wrong screen surface with the projector. Even though the hot-spots will still be there even if the projector is centered, it is also a problem when the projector is tilted. You do need to make sure the screen surface and projector are compatible.
- Off-axis light loss. If the projector is at an angle on-screen images can appear dark. This is a particular problem if the screen surface is made from a reflective material and the projector is tilted. This happens because the projector's lights needs to reflect into your eyes, and placing it at an angle makes more bounce off to the side than directly to you, along the centerline of the screen.
The main issue with tilting a projector often comes down to lighting and image distortion. Instead of trying to find a place where the projector is centered with the screen, there are a few ways you can resolve these problems.
How to Use a Projector at an Angle
The first step is to make sure that the screen and projector are compatible. It might be surprising to learn that not all work well together. If you have a short-throw (ST) projector you will get hot-spots and glare, even when it’s centered if the screen has an ambient light rejecting (ALR) surface. After ensuring that the projector and screen are compatible and images still aren’t crystal clear, here are some tips on how to correct the problem.
Keystone Correction

When you have the projector set up at an angle the top and bottom of the image will often appear distorted. Most models come with a convenient feature referred to as “keystone correction”. There are two types of keystone correction, manual and automatic. The one on your projector will depend on the make and model.
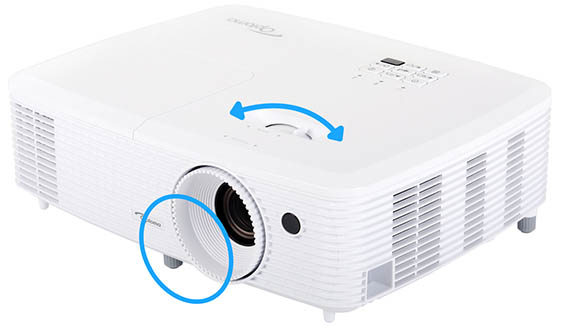
- Manual keystone correction allows you to adjust one axis, typically horizontal. With the keystone control dial, located on the internal lens, you can raise or lower the angled projector until the image is in focus. If the projector has vertical axis adjustment, move the control dial left to right until the image is centered. Sometimes these controls are digital, so be sure to check the projector's settings menu for this tool.
- Automatic or digital keystone correction is typically only on projectors with higher price points. Since the axis can be adjusted horizontally and vertically, it’s easier to bring images into focus when the projector is angled. Your projector probably won't have automatic keystone correction, but that's OK. It's a simple tool to use manually.
Units like the YABER Y30 Native 1080P Projector (on Amazon) may have their Keystone correction capabilities listed right in the title. In the case of this Yaber model – it lists +/- 50 degrees of Keystone correction range. Others will require you to check their product descriptions. Depending on how off-center you are forced to place your projector, you might need a larger Keystone correction capability.
Lens Shift

Like keystone correction, the lens shift feature allows you to adjust the location and shape of the image without moving the projector. Most projectors come with this feature, except extremely low priced ones.
With the lens shift, you can manually adjust the lens assembly side-to-side, up and down, or even diagonally without adjusting the projector’s angle. It works best when you are adjusting off-center or uneven images. It allows you to easily make minor adjustments at a time. Sometimes, this is all you need to center the image.
The lens shift on most projectors is a small dial. Some higher-priced models are motorized and come with a remote control that allows you to adjust it remotely.
Other Details
If you are really struggling to get a clean image, be sure to check out our other articles on projector throw ratios and our guide on mounting a projector off-center. They have more discussion on this topic that can fill in any blanks you have, and ultimately get you to a place where your projected image is crystal clear.
Disadvantages of Lens Shift and Keystone Correction
With any technology, there are disadvantages – a topic I've explored before in my pros and cons article on using a projector versus a TV – and this applies to the lens shift and keystone correction. Both allow for either horizontal or vertical adjustments. This means you can only adjust one axis. Unlike keystone correction that typically allows for horizontal adjustments, lens shift is the opposite with vertical moves more common. Horizontal lens shift is usually found on higher-priced projectors.
Another issue with using the lens shift feature is the range measured. It only measures 5 – 50 percent of the image width. This can limit the amount of room you have to play with the image making it more difficult to center. There are also disadvantage associated with keystone correction, though this is the preferred method to center an image when the projector is angled.
Either manually or digitally adjusting the shape and location of an image is never as effective as moving the projector or the lens. Adjusting the image at its source is almost always your best option. The other downside to using keystone correction is you could see a decrease in resolution due to the adjustments. Images can also still appear distorted even after the corrections are made.
You should be prepared to use all these tools interchangeably too – to make small changes to keystone, then lens shift, then keystone again as you dial in a clean image.
Conclusion
You can use your projector at an angle, just be ready to make some adjustments to the image. Chances are, it will be off-center or distorted at first. This doesn’t necessarily mean that you need to move the projector, there are ways you can bring the image into focus, either with keystone correction or lens shift. Both are capable of centering and clearing up distorted images without changing the projector’s angle.


